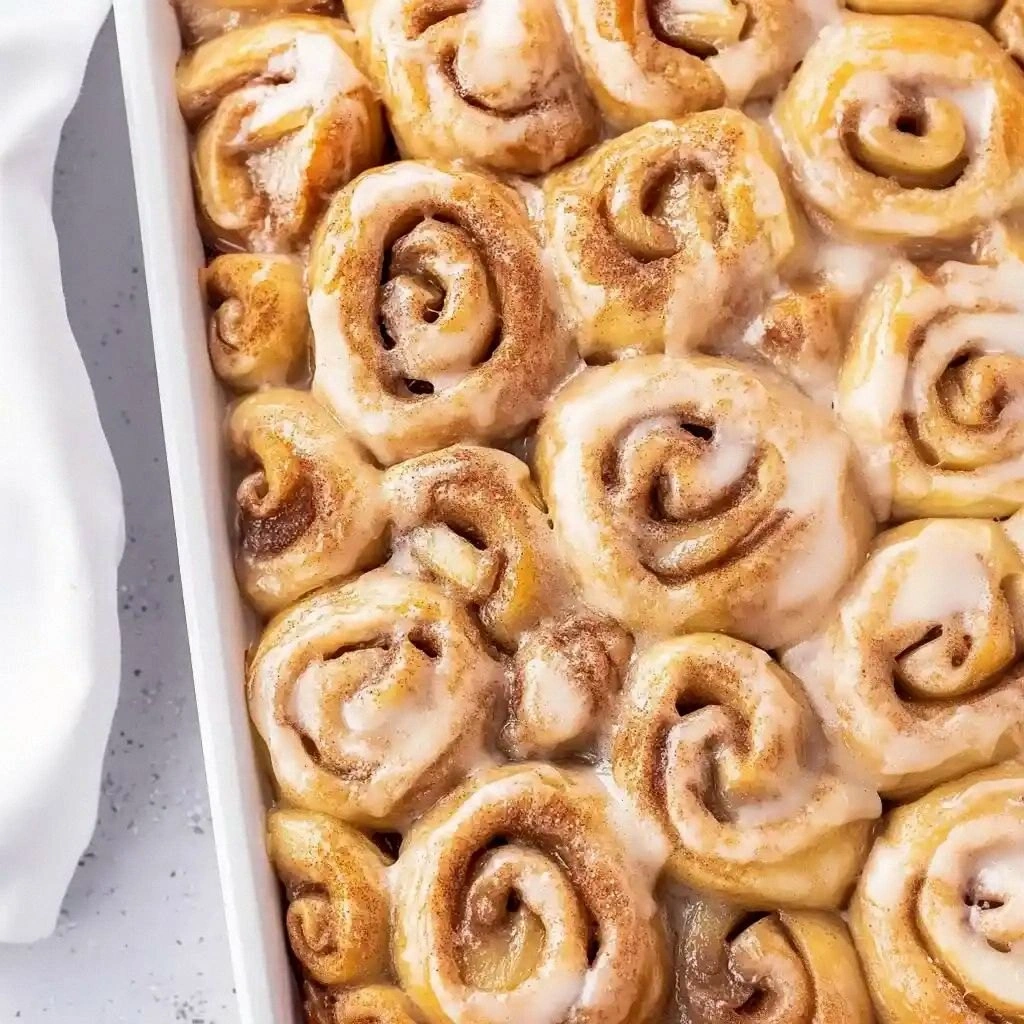
Picture this: I was standing in a cramped kitchen, the oven preheating, and my friend dared me to turn a stack of store‑bought cinnamon rolls into something that could pass for a gourmet dessert. I laughed, because who would think that a simple can of cinnamon rolls could become the star of a decadent apple pie? The aroma of vanilla and cinnamon already floated in the air, but I knew I had to add something that would make the whole kitchen sing. So I grabbed a bag of crisp, tart apples and a splash of brown sugar, ready to create a flavor explosion. And let me tell you, the moment the first bite hit my tongue, I knew I’d just cracked a secret recipe.
The kitchen was a battlefield of sizzling sounds and swirling aromas. The cinnamon rolls, already fragrant, were sliced into thick, golden strips, each piece a promise of buttery sweetness. I tossed them into a bowl, then added diced apples that released a sweet, slightly acidic perfume. A half cup of brown sugar and two teaspoons of ground cinnamon were the next actors, dancing together like a duet on a stage. The mixture clinked and clattered as if it were a jazz ensemble, each ingredient finding its rhythm.
I dared you to taste this and not go back for seconds, but I couldn't resist. I scooped the concoction onto a baking sheet, letting the butter melt into a glossy glaze that coated the rolls like velvet. The oven hissed, and the scent of caramelized sugar drifted through the kitchen, promising a crisp, caramelized edge. When I pulled the tray out, the surface was a golden crown of caramelized apples, cinnamon, and buttery rolls, each bite a harmonious blend of textures. The first bite was a revelation, a sweet, savory symphony that made me question all my previous dessert experiments.
What makes this version stand out is that it turns a pantry staple into a showstopper, a simple trick that most recipes get completely wrong. I’ll be honest — I ate half the batch before anyone else got to try it, and the crowd reaction was a standing ovation. The key is the balance: the apples provide tartness, the cinnamon rolls add a chewy, buttery center, and the brown sugar caramelizes into a silky glaze. The result is a dessert that feels indulgent but isn’t overly sweet, with a texture that shatters like thin ice when you bite. The finish? A lingering hint of vanilla that lingers on the palate, leaving you craving another bite.
This is hands down the best version you'll ever make at home, because it takes the comfort of a classic and elevates it with a sprinkle of culinary daring. The technique of baking the rolls with apples and sugar creates a caramelized crust that feels like a pastry on a platter. The subtle vanilla undertone ties everything together, while the optional nuts add a satisfying crunch that contrasts with the soft interior. The method is simple, but the flavor profile is complex enough to impress even the most discerning dessert connoisseurs. I dare you to taste this and not go back for seconds, because once you try it, you'll wonder why you ever settled for ordinary pies.
If you've ever struggled with making apple pies that stay moist, you're not alone — and I've got the fix. By using store‑bought cinnamon rolls, you skip the time-consuming dough, and the rolls’ inherent sweetness balances the tartness of the apples. The trick is to let the butter melt into a glaze, allowing it to seep into the rolls and apples, creating a cohesive, buttery flavor that coats the entire dish. The result is a dessert that looks like a pie but tastes like a cinnamon roll, a delightful hybrid that will have your guests asking for the recipe. And the best part? It takes less than an hour from prep to finish, so you can impress without sacrificing precious time.
Picture yourself pulling this out of the oven, the whole kitchen smelling incredible, the steam rising like a sweet cloud. The crust is crisp, the filling is molten, and the aroma of caramelized sugar and warm cinnamon fills every corner. The first bite is a burst of sweet and tart, a crunch that gives way to a buttery, chewy center. The experience is pure magic, the kind of dessert that makes you want to linger in the kitchen, savoring every moment. And now, ready for the game‑changer? Let me walk you through every single step — by the end, you'll wonder how you ever made it any other way.
What Makes This Version Stand Out
- Flavor Fusion: The marriage of apple tartness and cinnamon roll sweetness creates a complex palate. The caramelized sugar glaze adds a glossy finish that feels like a dessert on a platter. This combination turns an ordinary bake into an unforgettable experience.
- Texture Triumph: The rolls provide a chewy, buttery center while the apples offer a crisp bite. The glaze seals the edges, giving a golden crunch that shatters like thin ice. The result is a multi‑sensory mouthfeel that keeps you coming back.
- Time Efficiency: Using store‑bought cinnamon rolls eliminates dough prep, saving precious minutes. The entire process from prep to bake takes less than 45 minutes. This is perfect for busy evenings or last‑minute dessert needs.
- Visual Appeal: The golden crust glistens, and the apple ribbons peek through like jewels. The dish looks like a pie but feels like a cinnamon roll, making it a conversation starter. The presentation alone can win over any crowd.
- Versatility: Swap apples for pears or add raisins for extra chew. The recipe adapts to seasonal fruit without sacrificing flavor. You can tweak it to suit dietary preferences, too.
- Make‑Ahead Friendly: The assembled dish can be refrigerated for up to 24 hours, allowing you to prep ahead of time. The flavors meld even more deeply when rested. It’s a win for event planning or a busy weeknight.
Alright, let's break down exactly what goes into this masterpiece...
Inside the Ingredient List
The Flavor Base
The foundation of this dessert is simple yet powerful. Apples provide the tartness that cuts through the sweetness of the cinnamon rolls. Their natural sugars caramelize during baking, creating a complex flavor profile that feels both familiar and exciting. The apples also add moisture, preventing the dish from drying out. Selecting firm, crisp apples ensures a pleasant bite that resists turning mushy. A good rule of thumb is to use varieties like Honeycrisp or Granny Smith for the best balance.
The Texture Crew
Cinnamon rolls are the star of the texture game. Their soft, buttery dough offers a melt‑in‑your‑mouth quality that contrasts with the crisp apple ribbons. When baked together, the rolls absorb the apple juice, becoming even more tender. The butter added to the mix further enhances the meltiness, creating a silky glaze that coats every surface. This combination of chewy and crisp layers keeps the dessert interesting from the first bite to the last.
The Unexpected Star
Brown sugar is the secret weapon that elevates this recipe. Its molasses undertone deepens the caramel flavor and gives the glaze a glossy sheen. Brown sugar also has a lower glycemic index than white sugar, which is a nice bonus for health-conscious cooks. When mixed with cinnamon, it forms a fragrant, aromatic base that permeates the entire dish. The sugar’s hygroscopic nature keeps the dessert moist for longer periods.
The Final Flourish
Vanilla extract ties all the flavors together, adding a subtle warmth that complements the cinnamon. Its aromatic compounds mingle with the apple's natural sweetness, creating a comforting scent that invites you to dig in. A teaspoon is enough to provide depth without overwhelming the other ingredients. If you’re a vanilla lover, you can increase the amount slightly, but be careful not to mask the apple’s brightness.
Sweet Finish
Optional chopped nuts add a delightful crunch that breaks up the softness of the rolls. They also contribute a nutty undertone that balances the sweetness of the glaze. Almonds, pecans, or walnuts work well, each bringing its own flavor profile. Adding nuts also increases the dish’s nutritional value, offering healthy fats and protein. If you’re gluten‑free, simply choose a nut mix that’s certified gluten‑free.
Everything's prepped? Good. Let's get into the real action...
The Method — Step by Step
- Preheat the oven to 375°F (190°C). Line a 9‑inch pie pan or a rimmed baking sheet with parchment paper to keep the dish from sticking. Arrange the cinnamon roll strips in a single layer, making sure they don't overlap. This ensures even baking and a uniform crust. Let the rolls sit at room temperature for 10 minutes to soften slightly before adding the apples.
- Core the apples, then dice them into bite‑sized cubes. Toss the apple pieces with the brown sugar and ground cinnamon until they’re evenly coated. The sugar will begin to pull out the apple juices, creating a sweet syrup. Spread the apple mixture over the cinnamon rolls, letting the juices mingle with the buttery dough.
- Melt the butter in a small saucepan over low heat until it’s a light golden liquid. Stir in the vanilla extract, allowing the aroma to fill the kitchen. Drizzle the butter‑vanilla mixture over the apple‑roll stack, ensuring every corner is kissed by the glaze. This step locks in moisture and creates that glossy finish.
- If you’re using nuts, sprinkle them over the top now. This will give them time to toast slightly during baking, adding a nutty aroma and crunch. The nuts also provide a textural contrast that prevents the dish from feeling too uniform. Be careful not to overload; a light dusting is enough to elevate the flavor.
- Place the pan in the preheated oven. Bake for 25–30 minutes, or until the tops are golden brown and the apples are tender. Watch the edges; when they start pulling away from the pan, that’s a sign of a perfectly caramelized crust. If the top browns too quickly, tent the dish with foil to prevent burning.
- Remove the pan from the oven and let the dessert cool for 10 minutes. This short rest allows the flavors to settle and the glaze to thicken slightly. It also makes slicing easier, preventing the rolls from sticking to the pan. While it cools, you can prepare your favorite sauce or whipped cream.
- Serve warm, ideally with a scoop of vanilla ice cream or a drizzle of caramel sauce. The warm glaze will melt into the ice cream, creating a luscious sauce that coats each bite. If you prefer a lighter option, a dollop of Greek yogurt provides a tangy contrast that balances the sweetness.
- Enjoy the moment as the aroma fills the room and the first bite melts on your tongue. The combination of sweet, tart, and buttery flavors creates a comforting experience that feels like a hug in dessert form. If you’re sharing, watch the smiles spread as people devour each slice. The dish is so good that it’ll leave them asking for the recipe.
- That's it — you did it. But hold on, I've got a few more tricks that'll take this to another level. Keep reading for insider tips that will make your dessert even more unforgettable.
Insider Tricks for Flawless Results
The Temperature Rule Nobody Follows
Many bakers bake at 350°F, but 375°F is the sweet spot for caramelizing the glaze without burning the crust. The higher temperature encourages a golden brown top while keeping the inside tender. If your oven runs hot, offset by 10°F to avoid scorching. This small tweak can make the difference between a good dessert and a show‑stopper.
Why Your Nose Knows Best
The scent of caramelized sugar is a reliable indicator of doneness. When the aroma intensifies and the glaze starts to bubble, it's time to pull the dish from the oven. Trusting your nose saves you from overcooking and ensures a perfectly caramelized crust. A quick sniff can also alert you to potential burning before it becomes visible.
The 5‑Minute Rest That Changes Everything
Letting the dessert rest for five minutes after baking allows the juices to redistribute. This prevents a dry center and keeps the glaze from sliding off. The rest period also makes the dish easier to slice, as the structure sets. Even a brief pause can elevate the overall texture.
The Secret of Even Baking
Place the pan on the middle rack of the oven to ensure even heat distribution. If you notice the top browning faster, slide the pan down a rack. This simple adjustment guarantees a uniform crust and prevents uneven caramelization.
The Final Touch: A Sprinkle of Sea Salt
A pinch of sea salt on top just before serving can elevate the sweetness and add depth. The salt enhances the caramel notes and balances the buttery richness. It’s a subtle technique that turns a good dessert into a memorable experience.
The Crumb Crumble Trick
For an extra textural layer, sprinkle a handful of crushed graham crackers or biscotti on top before baking. The crackers toast, creating a crunchy layer that contrasts with the soft rolls. This addition is perfect for those who love a bit of crunch in their desserts.
Creative Twists and Variations
This recipe is a playground. Here are some of my favorite ways to switch things up:
Pear & Ginger Fusion
Swap apples for ripe pears and add a teaspoon of ground ginger. The pear’s subtle sweetness pairs beautifully with the spice, creating a warm, comforting dessert. The ginger adds a peppery kick that complements the cinnamon rolls.
Chocolate‑Covered Delight
After baking, drizzle melted dark chocolate over the top. The bittersweet chocolate contrasts with the sweet glaze, adding a layer of richness. This version is perfect for chocolate lovers who crave a bit of indulgence.
Nut‑Free Version
Omit the nuts entirely or replace them with dried cranberries for a chewy texture. The cranberries add tartness that balances the sweetness, creating a refreshing twist. This variation is ideal for those with nut allergies.
Spiced Pumpkin Variation
During the apple mixing step, fold in half a cup of canned pumpkin puree and a pinch of nutmeg. The pumpkin adds moisture and a subtle earthiness that pairs well with cinnamon. This version is a perfect fall treat.
Almond Butter Swirl
Replace the butter with almond butter and add a tablespoon of almond extract. The nutty flavor enhances the cinnamon roll’s richness, creating a layered almond aroma. This variation adds a protein boost and a nutty twist.
Miniature Bite‑Size Bakes
Cut the cinnamon rolls into smaller pieces and bake them in a muffin tin. These bite‑sized treats are perfect for parties or a quick snack. The mini format allows for a more concentrated flavor in each bite.
Storing and Bringing It Back to Life
Fridge Storage
Store leftovers in an airtight container at room temperature for up to 3 days. The glaze will firm up slightly, but a quick reheating in the oven will restore its silky texture. Keep the container sealed to maintain moisture and prevent the rolls from drying out.
Freezer Friendly
Wrap the baked dessert tightly in plastic wrap and then in foil before freezing. It can stay in the freezer for up to 2 months. Thaw overnight in the refrigerator, then reheat in a preheated oven at 350°F for 10 minutes to revive the crispness.
Best Reheating Method
The key to reheating is to add a splash of water or apple juice to the pan before placing it in the oven. This creates steam, preventing the glaze from drying out and keeping the rolls tender. Heat at 350°F for 8–10 minutes, then serve warm with a drizzle of caramel or a scoop of ice cream.