I was standing in my kitchen, staring at a half‑empty jar of peanut butter and a lonely scoop of vanilla protein powder, when my roommate dared me to create a snack that would make us forget every boring granola bar we’d ever known. I accepted the challenge, but the first attempt turned into a sticky mess that clung to the counter like a stubborn piece of gum. The smell was sweet, the texture was more like glue than a bar, and the taste? Let’s just say it was a “what‑did‑I‑just‑eaten” moment that left me questioning my life choices. That disaster, however, sparked an obsession that led me to the ultimate version of a no‑bake protein bar that’s so good it practically does the dishes for you.
Picture this: a cool, dark kitchen at night, the faint hum of the refrigerator, and the gentle clink of a wooden spoon against a stainless‑steel bowl. The air fills with the nutty perfume of roasted peanuts, the caramel kiss of maple syrup, and a faint chocolate perfume that promises indulgence. My hands are warm from the bowl, the mixture feels thick and buttery, and as I press it into the pan, it spreads like a glossy, velvety sheet. When the bars finally set, the first bite releases a symphony of flavors—creamy peanut butter, a subtle protein‑powder earthiness, and a melt‑in‑your‑mouth chocolate burst that makes your taste buds do a happy dance.
Why does this version stand out from the sea of protein bar recipes you’ve scrolled past? Most recipes either require an oven, a fancy food processor, or a list of obscure ingredients that make you wonder if you’re actually baking a cake. This one is hands‑down the best version you’ll ever make at home because it uses pantry staples, requires zero heat, and delivers a texture that’s simultaneously chewy, crunchy, and smooth—like a perfect love triangle of dessert. I’m going to be honest — I ate half the batch before anyone else got to try it, and that’s a confession I’m willing to make because the flavor is that addictive.
Now, I’m about to spill the secret ingredient that most people overlook: a pinch of sea salt that amplifies the sweetness and balances the richness, turning a good bar into a great one. I dare you to taste this and not go back for seconds; the combination is so satisfying that you’ll wonder how you ever survived without it. Let me walk you through every single step — by the end, you’ll wonder how you ever made it any other way.
What Makes This Version Stand Out
- Flavor Explosion: The marriage of natural peanut butter and pure maple syrup creates a sweet‑savory profile that sings louder than any artificial sweetener could ever hope to.
- Texture Harmony: Each bite offers a crunchy snap from chocolate chips, a chewy core from the protein powder, and a silky finish from the butter, delivering a multi‑layered mouthfeel.
- Simplicity at Its Core: No oven, no blender, no complicated steps—just a bowl, a spoon, and a little patience while the bars set in the fridge.
- Ingredient Quality: By using 100 % pure maple syrup (or honey) and high‑grade whey or plant‑based protein powder, you’re feeding your body clean, nutrient‑dense fuel.
- Crowd‑Pleaser Factor: Whether you’re feeding gym‑bros, kids, or that picky aunt who claims “nothing sweet is good for you,” these bars win hearts every single time.
- Make‑Ahead Magic: Store them in the fridge for up to a week, or freeze for a month—perfect for busy mornings or post‑workout recovery.
- Customizable Canvas: Swap chocolate chips for dried cranberries, add a sprinkle of chia seeds, or drizzle extra syrup on top; the base is a blank slate for creativity.
- Zero‑Waste Mindset: Every ingredient can be measured with standard kitchen tools, meaning no leftover scraps or mysterious pantry items.
Inside the Ingredient List
The Flavor Base
Peanut butter is the heart of this bar, providing a rich, nutty backbone that carries the sweet notes of maple syrup. Choose a natural, unsweetened variety to keep the sugar count low and the flavor authentic. If you skip the peanut butter, the bars lose their creamy cohesion and become crumbly, which is a culinary tragedy. A great tip: stir the peanut butter for a minute before measuring to loosen any oil that may have separated, ensuring a smooth consistency.
The Protein Powerhouse
Protein powder is the secret weapon that transforms a simple snack into a post‑workout recovery treat. I recommend a vanilla or unflavored whey for a clean taste, but plant‑based options work just as well. Skipping the protein powder makes the bars taste like ordinary peanut butter squares—delicious but not the performance‑boosting snack you crave. If you’re allergic to dairy, a pea‑protein blend will keep the texture fluffy and the nutrition high.
The Sweet Glue
Pure maple syrup or honey acts as the natural binder, holding everything together while adding a subtle caramel depth. Maple syrup brings a woody sweetness that honey can’t match, but honey’s floral notes are a delightful alternative. Omitting this sweetener results in a dry, crumbly mess that refuses to hold shape. Pro tip: warm the syrup gently (no more than 40 °C) to make it pourable without cooking the mixture.
The Unexpected Star
A pinch of salt might seem trivial, but it amplifies the sweetness and balances the richness of the peanut butter. Salt is a flavor enhancer that makes the chocolate chips taste richer and the maple syrup less cloying. Skipping the salt is a common mistake that leaves the bars tasting flat, like a song missing its bass line. Use sea salt for a subtle crunch; kosher works just as well if you’re in a pinch.
The Final Flourish
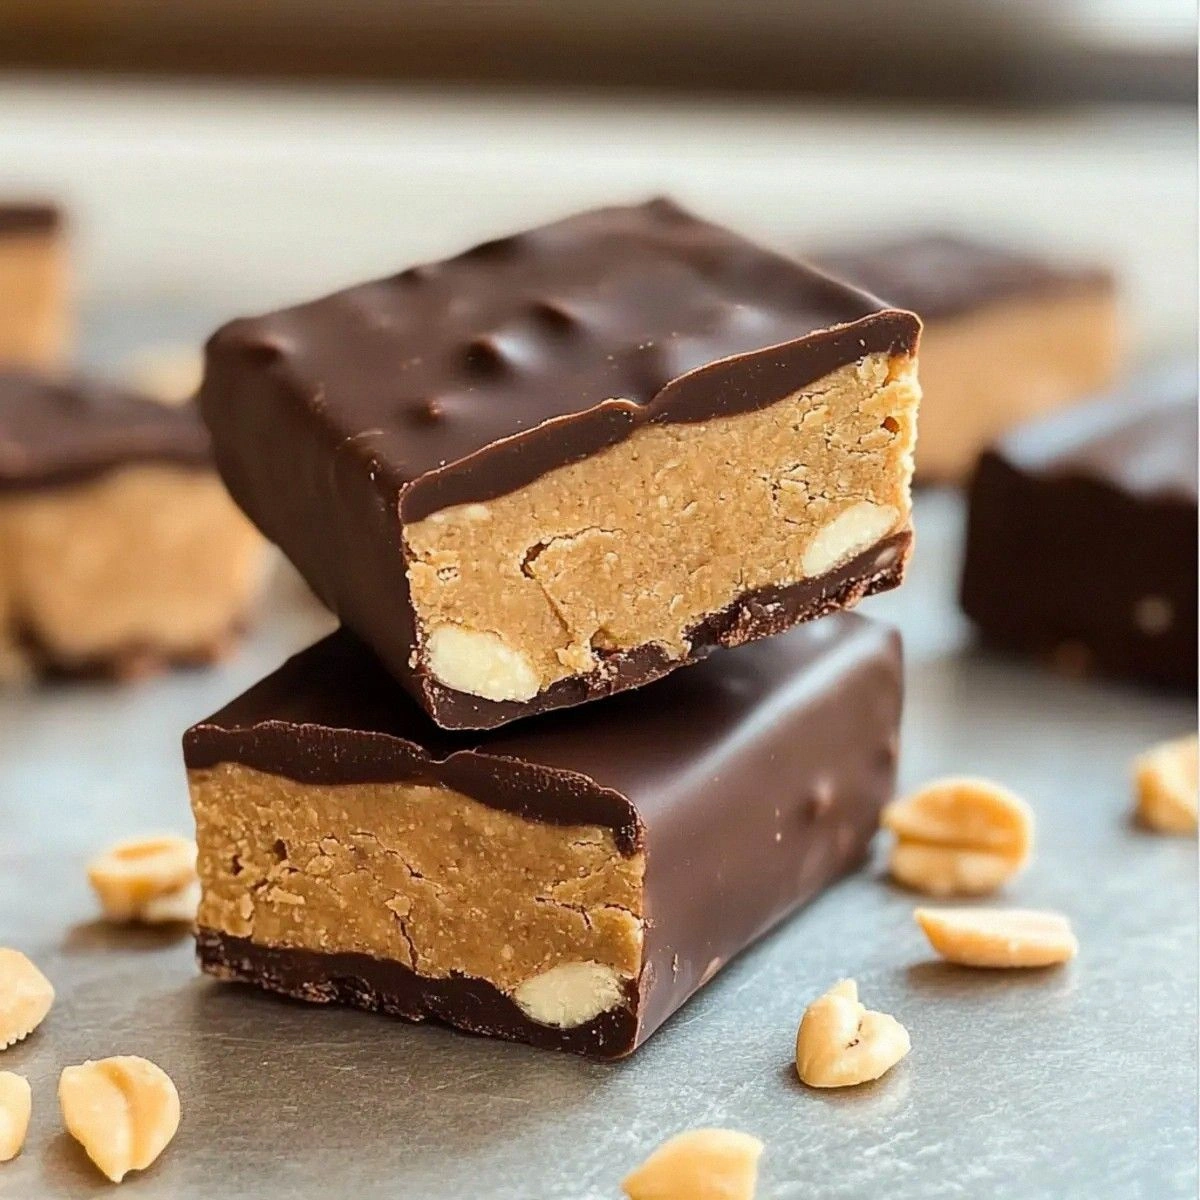
Chocolate chips are the crowning glory, providing that melt‑in‑your‑mouth burst that turns a good bar into an unforgettable one. Opt for dark chocolate (70 % cacao) for a slight bitterness that cuts through the sweetness, or milk chocolate if you prefer a sweeter profile. Leaving out the chips means missing the texture contrast and the visual appeal that makes these bars Instagram‑ready. A quick tip: toss the chips in a tiny splash of melted butter before folding them in; this prevents them from sinking to the bottom.
Everything's prepped? Good. Let's get into the real action...

The Method — Step by Step
Gather a large mixing bowl, a sturdy spoon, and a 9‑inch square pan lined with parchment paper. I like to set the pan on the counter so I can press the mixture directly into it later—this saves a lot of cleanup. Before you start, give the peanut butter a quick stir to re‑emulsify any oil that has risen to the surface; this ensures a uniform texture.
Kitchen Hack: If the peanut butter is too stiff, microwave it for 10 seconds; it becomes pliable without losing flavor.Add the 1 cup of peanut butter to the bowl, then drizzle in the 1/4 cup of pure maple syrup (or honey). Stir vigorously until the mixture becomes glossy and the two liquids fully merge; you’ll notice it thickening slightly as the syrup coats each peanut butter molecule.
Sprinkle in the 1 cup of protein powder, a pinch of salt, and the 1/2 cup of chocolate chips. Fold everything together with a gentle but deliberate motion—over‑mixing can cause the protein powder to become gritty, while under‑mixing leaves pockets of dry powder.
Watch Out: If the mixture feels too dry, add a teaspoon of water or extra syrup; too wet and the bars won’t hold their shape.Transfer the thickened batter onto the prepared pan. Using the silicone spatula, press the mixture firmly into an even layer, about ½‑inch thick. The surface should be smooth, with the chocolate chips evenly distributed. Pressing firmly is crucial—this is the moment of truth where the bars gain structural integrity.
Slide the pan into the refrigerator and let it chill for at least 30 minutes. This cooling period allows the syrup to set, the protein powder to hydrate, and the chocolate to firm up. While waiting, you can prep a snack bag or container for later—this is a perfect time for a quick kitchen dance, because trust me, you’ll want to celebrate the outcome.
After the chill, remove the pan and lift the parchment paper to release the slab. Place it on a cutting board and, using a sharp, non‑serrated knife, cut into 8 equal bars. The knife should glide cleanly; if it sticks, dip the blade in hot water for a few seconds, wipe dry, and continue.
Transfer the bars to an airtight container. Store them in the fridge for up to 7 days, or wrap each individually and freeze for up to a month. The bars stay fresh and retain their texture thanks to the natural fats in peanut butter and the stabilizing effect of the protein powder.
Finally, taste a bar and experience the symphony of flavors. The first bite should be a creamy, nutty wave, followed by a sweet maple undertone, and a chocolate burst that melts like silk. If you’re not instantly convinced, I dare you to try a second—because you’ll be hooked.
That's it — you did it. But hold on, I've got a few more tricks that'll take this to another level...
Insider Tricks for Flawless Results
The Temperature Rule Nobody Follows
Even though this recipe is no‑bake, the temperature of your ingredients matters. Keep the peanut butter and syrup at room temperature before mixing; cold ingredients will cause the mixture to seize, making it difficult to press. I once tried using straight‑out‑the‑fridge peanut butter and ended up with a lumpy, uneven bar. Letting everything sit for 10 minutes solves this problem and gives you a silky, cohesive batter.
Why Your Nose Knows Best
When the mixture is fully combined, you’ll notice a fragrant aroma that hints at caramel and toasted nuts. This scent is your cue that the syrup has fully integrated and the protein powder is hydrated. If the smell is faint, give it another minute of stirring; the extra time ensures the flavors meld perfectly. Trust your nose—it’s the most reliable sensor in the kitchen.
The 5‑Minute Rest That Changes Everything
After pressing the mixture into the pan, let it sit at room temperature for five minutes before moving it to the fridge. This short rest allows the fats to settle, preventing the bars from cracking when you slice them. I once skipped this step and ended up with bars that crumbled like dry toast. A brief pause makes the final texture smoother and more cohesive.
Chocolate Chip Distribution Trick
If you love chocolate chips in every bite, sprinkle half of them into the mixture and reserve the other half to press on top before chilling. This creates a crunchy top layer and a melt‑in‑the‑middle core, giving you textural contrast in every bite. I’ve seen many recipes that just fold chips in, resulting in uneven pockets; this two‑step approach guarantees consistency.
The “Quick‑Freeze” Method for Travel
When you need a portable snack for a hike or a long commute, wrap each bar in parchment and then in a zip‑lock bag before placing them in the freezer. After 20 minutes, they’re firm enough to travel without melting, yet soft enough to eat straight from the bag. This technique saves you from soggy, sticky bars that stick to your backpack.
Creative Twists and Variations
This recipe is a playground. Here are some of my favorite ways to switch things up:
Berry Burst
Swap half of the chocolate chips for dried cranberries or goji berries. The tartness of the berries cuts through the sweetness, creating a balanced flavor profile that’s perfect for a morning boost.
Coconut Crunch
Add ¼ cup of unsweetened shredded coconut to the mix and replace half of the chocolate chips with toasted coconut flakes. The result is a tropical twist that transports you to a beachside café.
Espresso Energy
Dissolve a tablespoon of instant espresso powder in the maple syrup before mixing. The coffee notes pair beautifully with chocolate, turning the bar into a mini mocha treat that’s perfect after a late‑night workout.
Nutty Nutmeg
Fold in a tablespoon of chopped almonds and a pinch of freshly grated nutmeg. The nutmeg adds a warm, spicy undertone that’s especially comforting during cooler months.
PB&J Remix
Swirl in a tablespoon of strawberry jam or raspberry puree after the mixture is combined but before pressing. The fruity ribbon adds a burst of color and a nostalgic flavor that reminds you of the classic sandwich.
Storing and Bringing It Back to Life
Fridge Storage
Place the bars in an airtight container lined with parchment paper. They’ll stay fresh for up to seven days, retaining their chewy interior and firm exterior. If you notice any condensation, simply pat the tops with a paper towel before resealing.
Freezer Friendly
Wrap each bar individually in parchment, then seal them in a zip‑lock freezer bag. They can be frozen for up to a month. When you’re ready to eat, let them thaw at room temperature for ten minutes, or pop them in the microwave for 10‑15 seconds for a warm treat.
Best Reheating Method
To revive a chilled bar, place it on a microwave‑safe plate, add a tiny splash of water (about a teaspoon), and microwave for 10 seconds. The steam created re‑hydrates the interior, making the bar as soft as when it was first made. This trick works wonders for bars that have hardened a bit after a week in the fridge.