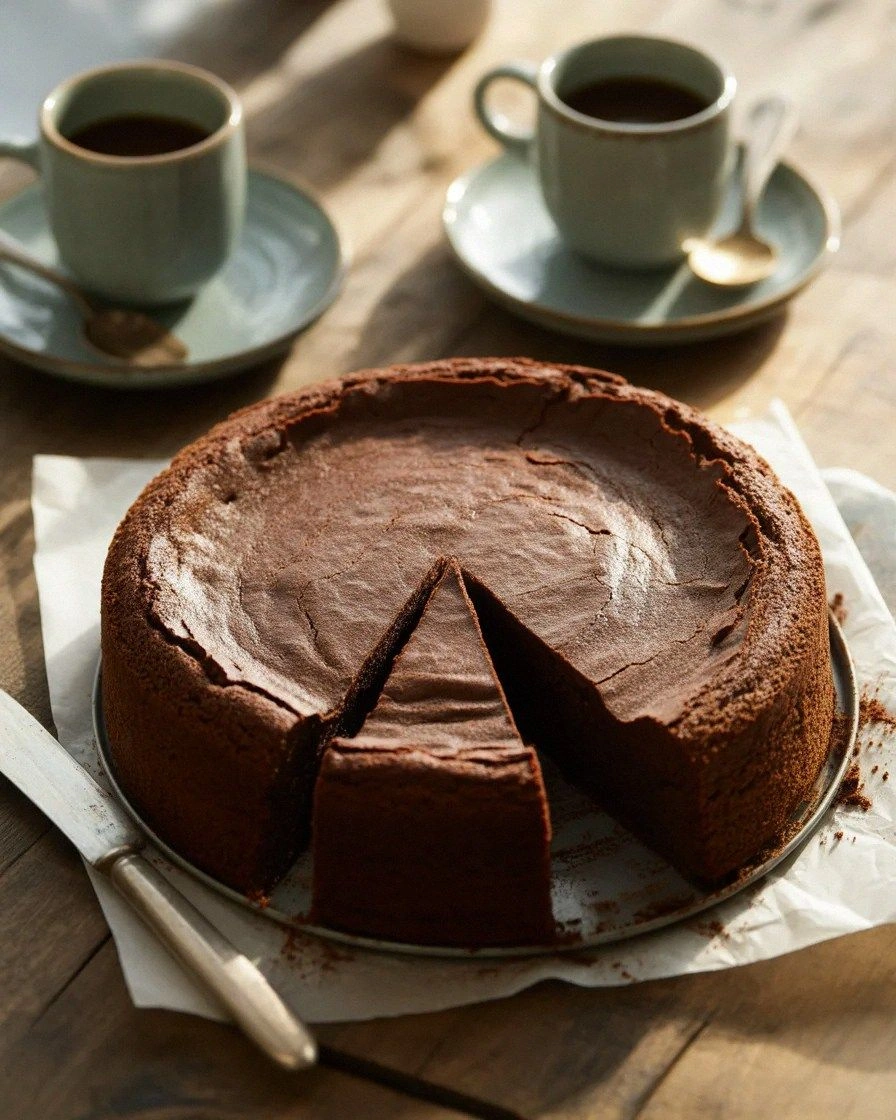
I was halfway through a midnight bake‑off when the kitchen turned into a chocolate catastrophe. The oven door opened to reveal a dark, gooey slab that had melted the counter and left a sticky trail to the sink. I stared at the mess, and in that moment I vowed to turn my flop into a triumph. That’s when I discovered the secret to a flourless chocolate masterpiece that not only saves the day but steals the spotlight.
Picture the room: the faint scent of melted chocolate, the rhythmic clink of a whisk, the soft glow of the oven light. My taste buds were already screaming for a richer, denser bite, while the sound of my own breathing whispered “you’ve got this.” The kitchen felt like a laboratory, and the counter became a stage for the most decadent dessert you’ve ever imagined. Every whisk, every stir was a note in a symphony of flavor.
What makes this version stand out? It’s not just the absence of flour; it’s the presence of pure, high‑quality chocolate, butter that melts into a silky embrace, and a pinch of salt that turns every bite into a revelation. The texture is a perfect blend of fudgy center and crisp edges that crackle like thin ice when you bite. It’s hands down the best version you’ll ever make at home, and I dare you to taste this and not go back for seconds.
I’ll be honest — I ate half the batch before anyone else got to try it. Most recipes get this completely wrong, either by overbaking or by using the wrong type of chocolate. Here’s what actually works: melt the chocolate gently, fold in the eggs one at a time, and bake just long enough for the edges to set while the center stays delectably gooey. The result is a cake that feels like a chocolate bomb that explodes in your mouth.
Picture yourself pulling this out of the oven, the whole kitchen smelling incredible, the steam curling in lazy ribbons. The top will have a glossy sheen, and the scent will drift through the hallway like a sweet perfume. The moment the first slice falls, you’ll hear that satisfying crack that says it’s done. And when you bite, the chocolate will melt, leaving a silky trail of pure bliss.
Let me walk you through every single step — by the end, you’ll wonder how you ever made it any other way. From selecting the perfect dark chocolate to mastering the bake time, we’ll cover every trick, hack, and nuance that turns an ordinary dessert into a showstopper. Ready? Let’s dive in.
What Makes This Version Stand Out
- Taste: The use of at least 60% cacao chocolate creates a deep, bittersweet flavor that’s balanced by the buttery richness. Each bite delivers a complex profile that lingers on the palate.
- Texture: The absence of flour means there’s no dry crumb; instead you get a dense, fudgy center that contrasts with a slightly crisp crust. The result feels like a chocolate bomb that melts in your mouth.
- Simplicity: Only five ingredients, no special equipment, and a process that takes less than an hour. It’s perfect for both beginners and seasoned bakers.
- Ingredient Quality: Using high‑quality chocolate is the key. Cheap chocolate can taste metallic; premium chocolate delivers a silky, buttery finish.
- Crowd Reaction: Guests will ask for the recipe after the first bite. The cake’s dramatic presentation and melt‑in‑your‑mouth texture make it a conversation starter.
- Make‑Ahead Potential: The cake can be baked and stored at room temperature for up to three days. It’s also freezer‑friendly, making it a great option for busy weeknights.
Inside the Ingredient List
The Flavor Base
Dark Chocolate (8 oz): This is the heart of the cake. A high‑quality chocolate with at least 60% cacao ensures a robust flavor and a glossy finish. Skipping this would turn the cake into a bland, buttery sponge. If you’re a fan of a slightly sweeter profile, choose a chocolate with 55% cacao, but be prepared for a less intense bite.
The Texture Crew
Butter (½ cup): Butter adds richness and helps the chocolate melt into a smooth, velvety batter. It also creates the glossy crust that makes the cake visually stunning. If you prefer a dairy‑free version, replace butter with coconut oil, but note that the flavor will shift slightly.
The Unexpected Star
Sugar (1 cup): Sugar balances the bitterness of the chocolate and sweetens the batter. It also contributes to the cake’s structure by reacting with the eggs. If you’re watching sugar, try a sugar substitute that behaves similarly in baking, such as erythritol, but adjust the amount to taste.
The Final Flourish
Eggs (4 large): Eggs bind the batter, provide lift, and create a tender crumb. They’re crucial for the cake’s structure; removing them would result in a dense, cake‑like texture. If you’re vegan, you can use flax eggs (1 tablespoon ground flaxseed mixed with 3 tablespoons water per egg) to achieve a similar binding effect.
Everything’s prepped? Good. Let’s get into the real action and turn these ingredients into a masterpiece.
The Method — Step by Step
- Preheat your oven to 375°F (190°C) and line a 9‑inch round cake pan with parchment paper. The parchment ensures easy release and a clean edge. Let the pan sit while you melt the chocolate; this will save you a moment of frustration later.
- Place the chocolate and butter in a heat‑proof bowl over a pot of simmering water (double‑boiler method). Stir until the mixture is completely melted and glossy. The gentle heat prevents scorching and keeps the chocolate silky. If you’re in a hurry, microwave in 20‑second bursts, stirring in between.
- Whisk the eggs in a separate bowl until they’re light and frothy. This aeration helps the batter rise slightly and creates a smoother texture. Now, slowly pour the egg mixture into the chocolate, whisking continuously to prevent curdling. The batter should feel smooth and glossy.
- Fold in the sugar gently with a spatula, ensuring it’s fully incorporated. The sugar should dissolve into the batter without forming clumps. This step is critical for achieving that smooth, fudgy texture.
- Pour the batter into the prepared pan, smoothing the top with a spatula. The batter should spread evenly; if it’s too thick, it will create a domed top. Place the pan in the preheated oven.
- Bake for 20–22 minutes. The cake is done when the edges are set but the center still looks slightly wet and glossy. The top should have a dark, almost black crust that’s slightly shiny. Avoid overbaking; the center must remain fudgy.
- Remove the cake from the oven and let it cool in the pan for 10 minutes. Then run a knife around the edges to loosen it, flip onto a wire rack, and let it cool completely. Cooling is essential to set the structure and prevent the cake from becoming gummy.
- Once cooled, dust the top with powdered sugar or drizzle melted chocolate for an extra touch of decadence. Slice with a sharp knife, wipe the knife clean between cuts to keep the edges neat. Serve immediately or store in an airtight container for up to three days.
That's it — you did it. But hold on, I've got a few more tricks that'll take this to another level. The next section will reveal insider secrets that elevate your cake from great to unforgettable.
Insider Tricks for Flawless Results
The Temperature Rule Nobody Follows
Ovens are notorious for temperature fluctuations. Even a 10°F difference can mean the difference between a fudgy center and a dry crumb. I always use an oven thermometer and preheat for at least 20 minutes before baking. This ensures consistent results every time.
Why Your Nose Knows Best
The aroma of chocolate melting is a reliable indicator of doneness. When the cake starts to emit a rich, deep scent, it’s almost ready. Trust your nose; it’s more accurate than a timer for this recipe.
The 5-Minute Rest That Changes Everything
After removing the cake from the oven, let it rest in the pan for 5 minutes. This allows the heat to distribute evenly, preventing a sudden rise that can crack the crust. It also lets the internal temperature stabilize, giving the cake its perfect texture.
Avoiding the Crumbly Trap
If you’ve ever tried a flourless cake that turned out crumbly, the culprit is usually overbaking. Keep a close eye on the edges; they should be set but not hard. The center should still be slightly glossy, which is the hallmark of a successful bake.
The Secret to a Glossy Crust
A glossy crust is achieved by ensuring the batter is smooth before baking and by avoiding any air pockets. Gently tap the pan on the counter to release trapped air. This small step can make the difference between a matte finish and a glossy, eye‑catching crust.
Creative Twists and Variations
This recipe is a playground. Here are some of my favorite ways to switch things up:
Salted Caramel Drizzle
Add a swirl of salted caramel on top before serving. The sweet‑salty contrast elevates the chocolate’s depth and introduces a luscious texture that melts in your mouth.
Espresso Infusion
Stir in one tablespoon of instant espresso powder into the batter. The espresso enhances the chocolate flavor and gives the cake a subtle, sophisticated kick.
Almond Crunch Topping
Sprinkle chopped toasted almonds over the cooled cake. The nutty crunch adds a delightful contrast to the smooth chocolate center and brings a nutty aroma.
Minty Chocolate Swirl
Fold a few drops of peppermint extract into the batter and swirl with a toothpick before baking. The mint adds a refreshing note that pairs beautifully with dark chocolate.
Raspberry Compote Accent
Serve the cake with a spoonful of raspberry compote. The tartness of the berries cuts through the richness, creating a balanced flavor profile that’s perfect for dessert.
Storing and Bringing It Back to Life
Fridge Storage
Wrap the cake tightly in plastic wrap and store in the refrigerator for up to five days. The cold environment preserves moisture and prevents the cake from drying out. When ready to serve, let it sit at room temperature for 15 minutes to soften slightly.
Freezer Friendly
For longer storage, slice the cake and wrap each slice individually in plastic wrap, then place them in a freezer bag. Freeze for up to two months. When you’re ready to enjoy, thaw overnight in the refrigerator.
Best Reheating Method
Reheat frozen slices in a microwave on low power for 30 seconds, or warm them in a preheated oven at 300°F for 5 minutes. Add a tiny splash of water before reheating to create steam; this keeps the cake moist and restores its melt‑in‑your‑mouth texture.