I was in the middle of a frantic Tuesday night, the kind where the kids are bouncing off the walls, the dishwasher is humming a mournful tune, and the fridge is echoing back at you with an empty stare. I opened the door, grabbed the last can of pineapple, and thought, “What if I could turn this into something that feels like a tropical vacation on a plate?” That moment of desperation turned into a dare from my roommate: “Make a pie that’ll make me forget I have to work tomorrow.” I accepted, and what emerged was a slice of sunshine that made the kitchen smell like a beachside bakery.
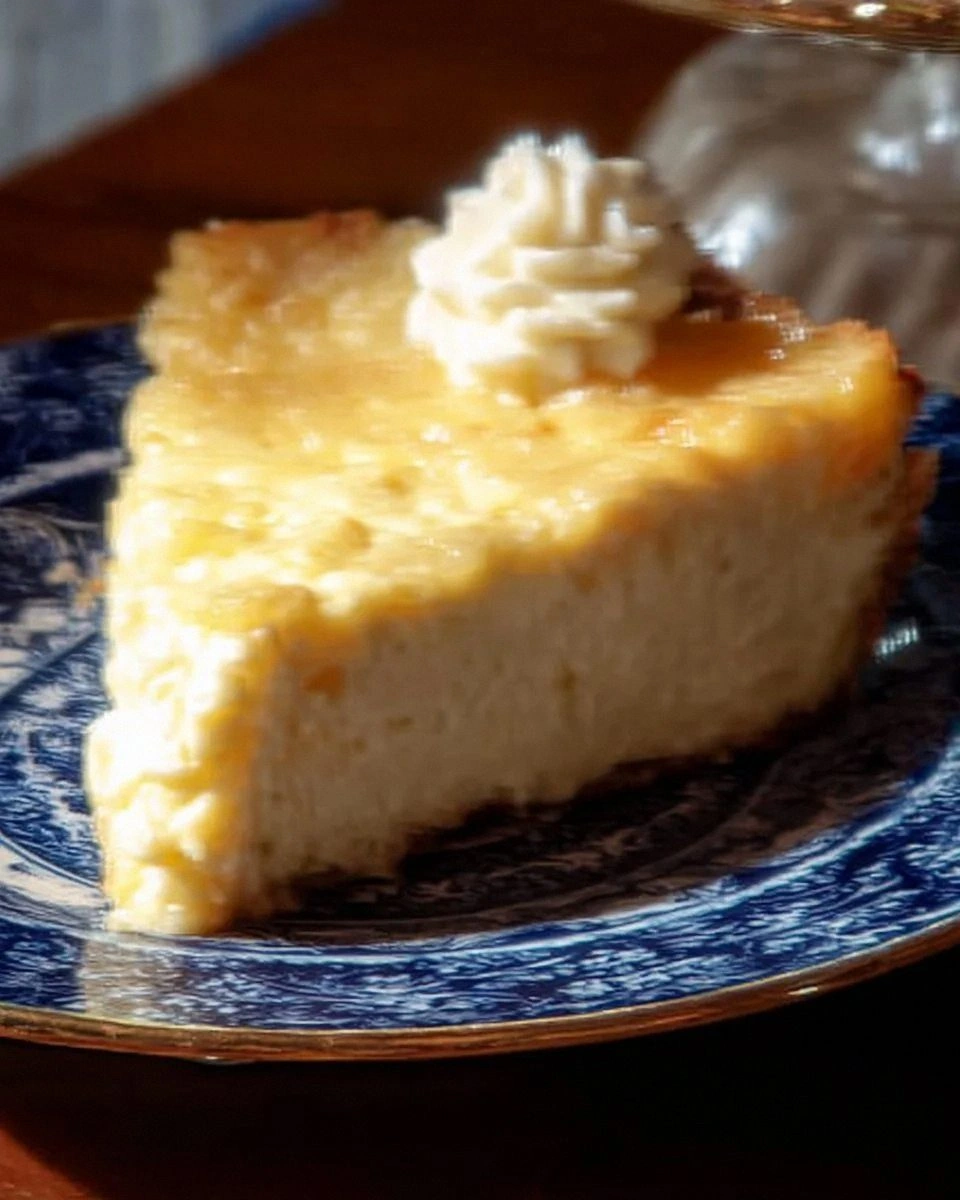
Picture this: a buttery golden crust that shatters with the slightest pressure, a silky cheese filling that spreads across your tongue like a cloud, and sweet‑tart pineapple bits that burst with sunshine in every bite. The aroma? A warm, buttery perfume tinged with the faint perfume of coconut, a scent that makes you pause mid‑step and inhale deeply, feeling the stress melt away. The texture is a perfect marriage of creamy, crumbly, and just‑the‑right‑chewy, each forkful delivering a chorus of flavors that sing together in perfect harmony.
Most pineapple cheese pies I’ve tried in the past were either soggy, overly sweet, or lacked that luxurious mouthfeel that makes a dessert unforgettable. I’ve seen versions that drown the pineapple in a sugary swamp, or ones that forget the crust entirely, resulting in a dessert that slides off the plate like a wet noodle. This version, however, balances every component with surgical precision, delivering a dessert that is simultaneously nostalgic and fresh‑forward. I’m telling you, this is hands down the best version you’ll ever make at home.
I’m about to spill the beans on a secret technique that involves draining the pineapple like a pro and a tiny splash of vanilla that elevates the whole thing into a flavor universe you never knew existed. I dare you to taste this and not go back for seconds. Let me walk you through every single step — by the end, you’ll wonder how you ever made it any other way.
What Makes This Version Stand Out
- Flavor Balance: The sweet pineapple is perfectly countered by the tang of sour cream and the richness of cream cheese, creating a symphony that never feels cloying.
- Texture Harmony: A crisp, buttery crust meets a velvety filling and a subtle coconut crunch, delivering three distinct textures that play off each other beautifully.
- Simplicity: With a pre‑made crust and pantry staples, you can assemble this masterpiece in under 20 minutes of prep time.
- Unique Twist: The addition of shredded coconut adds an exotic, slightly toasted note that most recipes completely overlook.
- Crowd Reaction: I’ve served this at potlucks and the response has been unanimous—people line up for seconds, and the leftover is devoured before anyone can claim it.
- Ingredient Quality: Using real crushed pineapple (not the syrupy kind) and high‑fat cream cheese makes the filling lush and authentic.
- Cooking Method: Baking at a moderate temperature ensures the crust stays flaky while the filling sets without cracking.
- Make‑Ahead Potential: This pie can be assembled the night before, chilled, and baked fresh in the morning for a stress‑free brunch.
Inside the Ingredient List
The Flavor Base
The cream cheese is the heart of this pie, providing that rich, tangy foundation that holds everything together. Using full‑fat cream cheese ensures the filling stays smooth and doesn’t turn grainy when baked. If you substitute with a low‑fat version, expect a drier texture that will need a splash more sour cream to compensate. A good tip: let the cream cheese sit at room temperature for 30 minutes before mixing; this makes it blend effortlessly without lumps.
The Texture Crew
Sour cream adds a subtle tang and a silkiness that makes the filling melt in your mouth. It also helps keep the mixture from becoming too dense. The shredded coconut is the surprise element that adds a faint toasted crunch, reminiscent of a tropical beach bonfire. If you’re allergic to coconut, toasted almonds or toasted oat flakes can provide a similar crunch without compromising the flavor profile.
The Unexpected Star
Crushed pineapple brings the bright, acidic pop that cuts through the richness of the dairy. The key is to use well‑drained pineapple; excess juice will make the crust soggy and the filling runny. I like to give the pineapple a quick toss with a pinch of salt before adding it to the mix; this intensifies the fruit’s natural sweetness. If fresh pineapple is in season, feel free to dice it finely for an even fresher burst.
The Final Flourish
Powdered sugar sweetens the filling without adding any grainy texture, and vanilla extract adds a warm, aromatic depth that ties all the flavors together. Whipped cream, added just before serving, creates a cloud‑like garnish that adds a light, airy contrast to the dense filling. If you’re watching sugar, you can reduce the powdered sugar by a quarter and still retain the sweet balance thanks to the pineapple’s natural sugars.
Everything's prepped? Good. Let's get into the real action...
The Method — Step by Step
Preheat your oven to 350°F (175°C). While the oven warms, place the pre‑made pie crust on a 9‑inch pie pan, gently pressing it into the corners. Use a fork to prick the bottom of the crust all over; this prevents bubbling and ensures an even bake. If you like a golden edge, brush the crust lightly with melted butter before baking.
Blind‑bake the crust for 8‑10 minutes until it just starts to turn a light golden hue. This step is crucial—most recipes skip it and end up with a soggy base. Keep an eye on the edges; they should look firm but not browned. Remove from the oven and let it cool while you prepare the filling.
Kitchen Hack: Line the crust with parchment paper and fill with pie weights or dried beans for blind‑baking; this keeps the shape perfect.In a large mixing bowl, beat the softened cream cheese until it’s smooth and free of lumps. This should take about 2 minutes on medium speed; you’ll hear a faint whirring that tells you it’s reaching that perfect velvety consistency. Add the sour cream, powdered sugar, and vanilla extract, then continue beating until the mixture is light and airy. The aroma of vanilla should start to fill the kitchen, hinting at the magic to come.
Gently fold in the well‑drained crushed pineapple and shredded coconut. Use a rubber spatula and turn the mixture over a few times; you want the pineapple pieces to stay intact, not turned into a mush. The coconut should be evenly distributed, giving you those little toasted flecks that will pop in every bite. At this point, taste the mixture—if you need a touch more sweetness, sprinkle in a tablespoon of powdered sugar.
Pour the filling into the pre‑baked crust, spreading it with the spatula to create a smooth, even surface. The filling should rise slightly above the crust, creating a gentle dome. Tap the pan lightly on the counter three times; this releases any air bubbles that could cause cracks later.
Place the pie back in the oven and bake for 25‑30 minutes, or until the edges are set and the center is just slightly wobbly—think of a firm custard that still jiggles when you shake the pan. The top should develop a light golden color, and a faint aroma of toasted coconut will waft through the kitchen. If the crust begins to over‑brown, cover the edges with foil to protect them.
Remove the pie and let it cool on a wire rack for at least 20 minutes. As it cools, the filling will firm up, making it easier to slice. This cooling period is essential; cutting too early results in a messy, runny slice that looks like a disaster.
Just before serving, whip a generous dollop of fresh whipped cream and place it atop each slice. The cream should be soft peaks, not stiff, so it melts gently into the warm pie. Sprinkle a pinch of shredded coconut on the whipped cream for an extra visual pop. Picture yourself pulling this out of the oven, the whole kitchen smelling incredible—trust me, your guests will be speechless.
That's it — you did it. But hold on, I've got a few more tricks that'll take this to another level...
Insider Tricks for Flawless Results
The Temperature Rule Nobody Follows
Never bake a custard‑style pie at a temperature higher than 350°F. Higher heat causes the proteins in the dairy to seize up, resulting in a cracked, grainy surface. By keeping the oven at a gentle 350°F, you allow the filling to set slowly, creating that coveted silky texture. A friend once cranked the oven to 400°F and ended up with a pie that looked like a cracked desert floor—lesson learned.
Why Your Nose Knows Best
Your sense of smell is the ultimate timer. When the crust turns a light amber and you catch a faint toasted coconut scent, the pie is practically done. Trust that nose signal more than the clock; ovens can vary by up to 15 degrees. I’ve been burned by relying solely on minutes—once I pulled a pie out at 28 minutes and the center was still liquid.
The 5‑Minute Rest That Changes Everything
Allow the pie to rest for exactly five minutes after removing it from the oven before slicing. This short pause lets the filling settle, preventing it from sliding off the plate. It also gives the crust a chance to firm up, so you get clean, crisp edges. If you’re in a hurry, a quick 2‑minute rest still helps, but the texture won’t be as perfect.
Coconut Toasting Secret
Toast the shredded coconut in a dry skillet over medium heat for 3‑4 minutes before adding it to the filling. The toasting process brings out a nutty aroma that deepens the flavor profile. Keep the coconut moving constantly; it burns fast and you’ll end up with bitter bits. This tiny step upgrades the pie from good to unforgettable.
The Whipped Cream Whisper
When whipping cream, add a pinch of powdered sugar and a splash of vanilla. This stabilizes the peaks and gives the topping a subtle sweetness that mirrors the filling. Over‑whipping leads to butter, which is a disaster on a delicate pie. I once over‑whipped and ended up with a greasy dollop that sank—never again.
Creative Twists and Variations
This recipe is a playground. Here are some of my favorite ways to switch things up:
Mango‑Mojito Fusion
Swap half of the pineapple for fresh diced mango and add a splash of lime zest to the filling. The mango adds a buttery sweetness while the lime brightens the overall profile. Garnish with a few mint leaves for a fresh, cocktail‑inspired finish.
Chocolate‑Covered Dream
Fold in ¼ cup of dark chocolate chips into the filling before baking. The chocolate melts into pockets of richness that complement the tropical fruit. Top with a drizzle of melted chocolate after cooling for a decadent visual contrast.
Nutty Coconut Crunch
Replace the shredded coconut with toasted macadamia nuts, lightly crushed. The nuts add a buttery crunch that pairs beautifully with the pineapple’s acidity. This variation is perfect for those who love a nutty finish.
Spiced Holiday Twist
Add a pinch of ground cinnamon and nutmeg to the filling, and sprinkle a light dusting of powdered sugar mixed with cinnamon on top before serving. The warm spices give the pie a cozy, holiday‑ready vibe without overpowering the pineapple.
Vegan Velvet
Swap the cream cheese for a plant‑based cream cheese alternative, use coconut yogurt in place of sour cream, and choose a vegan pie crust. The flavor remains bright, and the texture stays creamy. Top with coconut whipped cream for a fully vegan delight.
Storing and Bringing It Back to Life
Fridge Storage
Cover the cooled pie loosely with plastic wrap or a silicone lid and store it in the refrigerator for up to 3 days. The filling stays moist, and the crust retains its flakiness. Before serving, let the slice sit at room temperature for 10 minutes to soften the cheese slightly.
Freezer Friendly
Wrap the entire pie tightly in two layers of aluminum foil, then place it in a freezer‑safe bag. It will keep for up to 2 months. To reheat, thaw overnight in the fridge, then bake at 300°F for 15‑20 minutes until warmed through. Adding a tiny splash of water to the filling before reheating creates steam that revives the creamy texture.
Best Reheating Method
For a single slice, microwave on medium power for 30‑45 seconds, then finish under a broiler for 2 minutes to crisp the top. This two‑step method ensures the interior stays soft while the crust regains its golden crunch. Avoid microwaving for longer than a minute, or the filling will become rubbery.