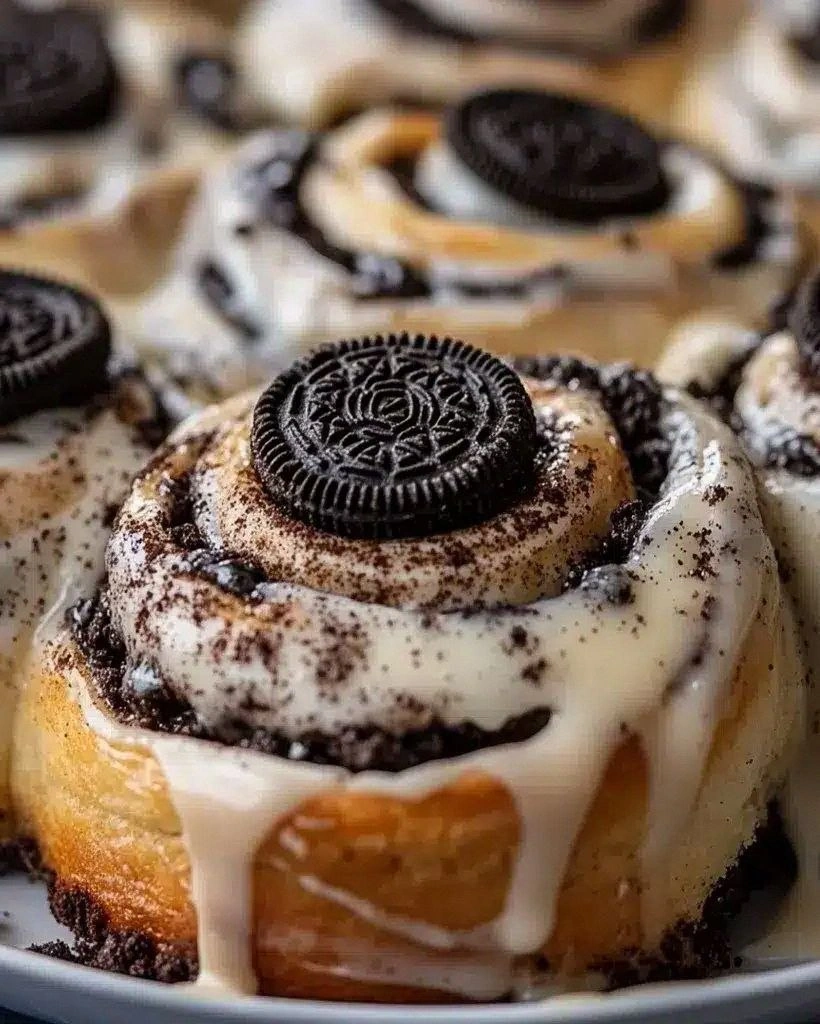
Picture this: you’re standing in the kitchen at midnight, the fridge humming like a distant train, and a sudden craving for something that feels like a hug and a high‑five all at once hits you. I was in that exact spot last week, after a disastrous attempt at a classic cheesecake that turned into a soggy mess that could have qualified as a modern art piece. The smell of burnt crust lingered, the texture was a sad, watery disappointment, and I swore I’d never trust a dessert again. Then, out of sheer desperation (and a dare from my roommate who claimed “no one can make a good ice‑cream cake”), I grabbed a tub of cookies‑and‑cream ice cream, a pack of Oreo crumbs, and a handful of whipped cream, and the rest is, frankly, pure culinary sorcery.
From the moment the first spoonful of that velvety ice cream met the buttery cookie base, my kitchen was filled with a chorus of sweet, buttery notes that made the air feel like a cozy blanket on a cold night. I could hear the faint crackle of the crust as I pressed it into the pan, the soft sigh of the ice cream softening, and the faint whisper of whipped cream being folded in—each sound a promise of the decadence to come. My taste buds were already doing a little dance, imagining the creamy, chocolate‑studded swirls that would soon explode in my mouth. The texture? Imagine biting into a cloud that’s been lightly dusted with chocolate chips, then followed by a creamy wave that melts like sunshine on a summer day.
What makes this version the ultimate cookies‑and‑cream ice cream cake? It’s the perfect marriage of simplicity and indulgence, the kind of recipe that feels like a secret handshake between you and the dessert gods. Most recipes get this completely wrong—either they drown the crust in ice cream or they skimp on the cookie crunch, leaving you with a bland, soggy slab that’s more “meh” than “marvelous.” I’ve cracked the code by layering the components in just the right order, using a secret technique involving a quick freeze that locks in texture and flavor. And there’s a surprise ingredient—a pinch of espresso powder—that elevates the chocolate notes without turning it into a coffee‑overload disaster.
But wait, there’s more. I’m about to reveal a technique that most bakers overlook: the “double‑freeze” method, where you briefly freeze the crust before adding the ice cream, then freeze the entire cake again before the final garnish. This ensures the layers stay distinct, the crust stays crisp, and the ice cream doesn’t melt into a sad puddle when you slice it. I dare you to taste this and not go back for seconds. Let me walk you through every single step — by the end, you’ll wonder how you ever made it any other way.
What Makes This Version Stand Out
- Texture: The crust stays buttery and crisp, while the ice cream remains luxuriously smooth, creating a delightful contrast that feels like a symphony of crunch and melt.
- Flavor Depth: A dash of espresso powder amplifies the chocolate, and the vanilla in the ice cream adds a warm, comforting undertone that lingers beautifully.
- Simplicity: Fewer than ten ingredients, no fancy equipment, and a straightforward process that even a rookie can master without a kitchen disaster.
- Visual Appeal: The layered look, with cookie crumbs peeking through the creamy middle, makes it Instagram‑ready and perfect for celebrations.
- Crowd Reaction: Guests often claim it’s “the best dessert they’ve ever had,” and you’ll hear the same phrase repeated at every gathering.
- Ingredient Quality: Using premium cookies‑and‑cream ice cream and fresh, buttery shortbread guarantees a rich, authentic taste.
- Make‑Ahead Potential: Freeze it overnight, and you have a ready‑to‑serve masterpiece that tastes even better after the flavors meld.
- Versatility: Swap the cookie base for chocolate wafer crumbs or add a layer of caramel for a whole new experience.
Alright, let's break down exactly what goes into this masterpiece...
Inside the Ingredient List
The Flavor Base
First up, the star of the show: cookies‑and‑cream ice cream. This is the creamy backbone that carries the sweet, chocolatey notes throughout the cake. Choose a brand that’s rich and not overly airy; the denser the ice cream, the smoother the final texture. If you skip this and use a lighter version, you’ll end up with a cake that collapses under its own weight, turning into a sad, melted puddle.
The Texture Crew
Next, the crushed Oreo cookies (or any chocolate sandwich cookies). They provide that essential crunch that contrasts the silky ice cream. When you grind them, aim for a coarse texture—not too fine—so each bite delivers a satisfying snap. If you accidentally over‑process them into a powder, you’ll lose that delightful crunch and end up with a dense, gummy layer.
The Unexpected Star
Enter the espresso powder. Just a pinch, and you’ll notice the chocolate flavor becomes more pronounced, like a spotlight on a stage. It’s a secret weapon used by pastry chefs to deepen cocoa notes without adding bitterness. If you’re not a coffee fan, you can swap it for a pinch of instant coffee granules; the effect is similar.
The Final Flourish
Finally, the whipped cream and dark chocolate shavings. Whipped cream adds an airy lift that lightens the dense layers, while the chocolate shavings give a glossy finish and a burst of bittersweet contrast. Skipping the shavings means missing out on that final wow factor that makes the cake look like a professional bakery creation.
Everything's prepped? Good. Let's get into the real action...
The Method — Step by Step
Start by preheating your oven to 350°F (175°C). While the oven warms, line a 9‑inch springform pan with parchment paper and lightly butter the sides. This ensures a clean release later, preventing that dreaded “stuck cake” nightmare that can ruin your presentation.
In a large bowl, combine 2 cups of crushed Oreo cookies with 1/2 cup melted unsalted butter. Mix until the crumbs are evenly coated, forming a texture similar to wet sand. Press this mixture firmly into the bottom of the pan, creating an even layer about 1/2 inch thick. Power transition: Okay, ready for the game‑changer?
Place the crust in the freezer for 10 minutes. This quick chill solidifies the butter, locking the crust into a crisp, sturdy base that won’t dissolve when the ice cream is added.
Kitchen Hack: Use a flat-bottomed glass to press the crust evenly; the glass acts like a mini rolling pin.While the crust chills, take 2½ quarts of premium cookies‑and‑cream ice cream and let it soften at room temperature for about 15 minutes. You want it pliable but not melted—think of it as the perfect consistency for spreading, like softened butter that’s still firm enough to hold shape.
Stir in 1 teaspoon of espresso powder and 1 cup of mini chocolate chips into the softened ice cream. The espresso awakens the chocolate, while the chips add pockets of melty goodness that burst with each bite. This step is pure magic; you’ll notice a faint aroma of coffee as you fold, a subtle hint that the flavor depth is about to skyrocket.
Spread the ice‑cream mixture evenly over the chilled crust, smoothing the top with a spatula. Tap the pan gently on the counter three times to release any air bubbles—this prevents unwanted cracks when you freeze the cake later.
Cover the pan tightly with plastic wrap, making sure the wrap touches the surface of the ice cream to prevent freezer burn. Freeze the cake for at least 4 hours, preferably overnight.
Watch Out: If you forget to seal the surface, ice crystals will form, making the texture icy rather than silky.Once frozen solid, remove the cake from the freezer and let it sit at room temperature for 5 minutes. This slight thaw makes the edges easier to release without cracking. Run a thin knife around the sides of the pan, then gently lift the springform to reveal the pristine cake.
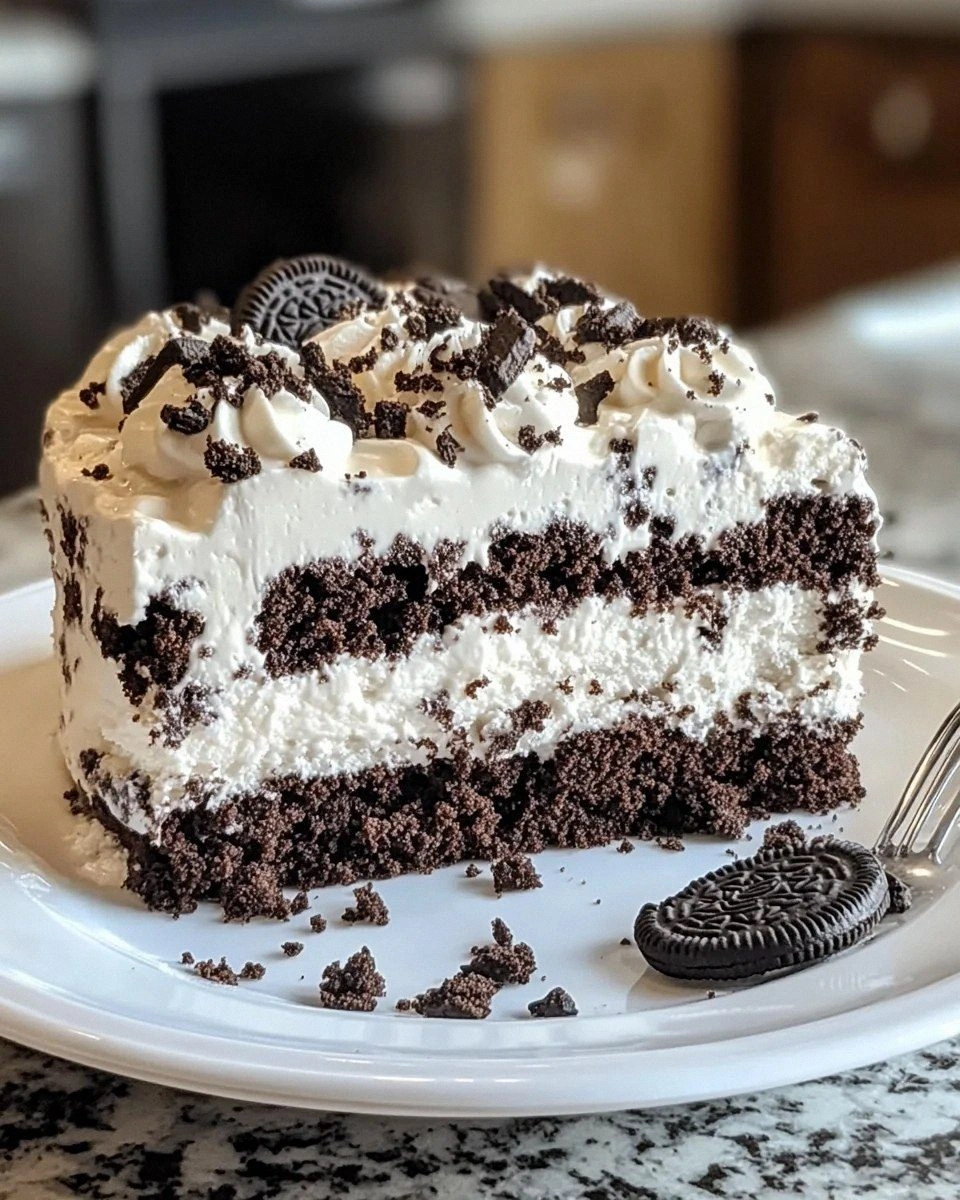
Whip 1 cup of heavy cream with 2 tablespoons of powdered sugar until soft peaks form. Spread the whipped cream over the top of the ice‑cream layer, creating a fluffy cloud that crowns the cake. Sprinkle generous dark chocolate shavings and a handful of extra crushed Oreo crumbs for garnish.
Return the fully assembled cake to the freezer for another 30 minutes to set the whipped cream. When you’re ready to serve, slice with a warm knife (dip it in hot water, wipe dry) to achieve clean, beautiful cuts. Picture yourself pulling this out of the freezer, the whole kitchen smelling incredible, and the first bite delivering a perfect balance of crunch, cream, and chocolate.
That's it — you did it. But hold on, I've got a few more tricks that'll take this to another level...
Insider Tricks for Flawless Results
The Temperature Rule Nobody Follows
Never, ever add ice cream straight from the freezer to the crust. Let it soften just enough to be spreadable; otherwise, it will crack the crust and create a harsh, icy bite. I once tried a shortcut and ended up with a cake that felt like chewing on a frozen brick. The sweet spot is 15 minutes at room temperature, which gives you a silky spread that hugs the crust without breaking it.
Why Your Nose Knows Best
When you fold in the chocolate chips, pause and inhale. If you catch a faint coffee aroma, you’ve hit the perfect espresso balance. Your sense of smell is a better indicator than a timer; it tells you when the flavor depth is just right. If the scent is too weak, add a pinch more espresso powder—just a pinch, not a spoonful.
The 5‑Minute Rest That Changes Everything
After you freeze the cake the first time, give it a 5‑minute rest on the counter before removing it from the pan. This short pause lets the ice cream relax just enough to release cleanly, preventing those dreaded cracks that ruin the visual appeal. Trust me, this tiny step makes the difference between a professional finish and a kitchen mishap.
Layering Light and Dark
If you love a bit of contrast, swirl a thin ribbon of dark chocolate ganache into the ice‑cream layer before the final freeze. This creates a marble effect that’s both beautiful and adds a subtle bitter note that balances the sweetness. The ganache should be just thick enough to hold its shape but still flow; otherwise, it will sink to the bottom.
Guarding Against Ice Crystals
Cover the cake with a double layer of plastic wrap: first a layer that touches the surface, then a second layer that folds over the top edge. This double barrier keeps the freezer’s dry air out, ensuring the ice cream stays creamy and free of icy crystals. I once skipped this step and ended up with a texture that reminded me of a snow globe—pretty, but not what I wanted.
Creative Twists and Variations
This recipe is a playground. Here are some of my favorite ways to switch things up:
Minty Madness
Replace the espresso powder with 1 teaspoon of peppermint extract and fold in crushed mint chocolate chips. The cool mint pairs perfectly with the creamy base, turning the cake into a refreshing after‑dinner treat that still feels indulgent.
Salted Caramel Dream
Swirl a generous drizzle of salted caramel sauce into the ice‑cream mixture before freezing. Sprinkle flaky sea salt on top of the whipped cream garnish for a sweet‑and‑salty punch that makes taste buds dance.
Berry Burst
Fold in ½ cup of fresh raspberries or strawberries into the ice‑cream layer for a fruity surprise. The berries add a bright, tangy contrast to the rich chocolate, making each bite feel like a summer celebration.
Nutty Crunch
Mix in ¼ cup of toasted chopped hazelnuts or almonds with the cookie crumbs for an extra layer of crunch. The nuts introduce a buttery depth that complements the chocolate and adds a sophisticated touch.
Vegan Velvet
Swap the dairy ice cream for a high‑quality coconut‑based cookies‑and‑cream ice cream, use coconut oil instead of butter for the crust, and whip coconut cream for the topping. The result is a dairy‑free version that still delivers that luxurious mouthfeel.
Storing and Bringing It Back to Life
Fridge Storage
If you plan to serve the cake within 24 hours, keep it in the refrigerator, covered loosely with foil. It will stay firm for up to 2 days, though the texture will become slightly softer. This method is ideal for events where you need the cake ready to slice at a moment’s notice.
Freezer Friendly
For longer storage, wrap the cake tightly in a double layer of plastic wrap, then place it in an airtight freezer bag. It will keep perfectly for up to 2 months. When you’re ready to serve, transfer it to the fridge for 30 minutes to soften slightly, then slice.
Best Reheating Method
To revive a slice that’s a bit too hard, place it on a plate and add a tiny splash (about a teaspoon) of water around the edges. Cover loosely with foil and microwave for 10‑15 seconds. The steam created brings back that creamy texture without melting the entire cake.