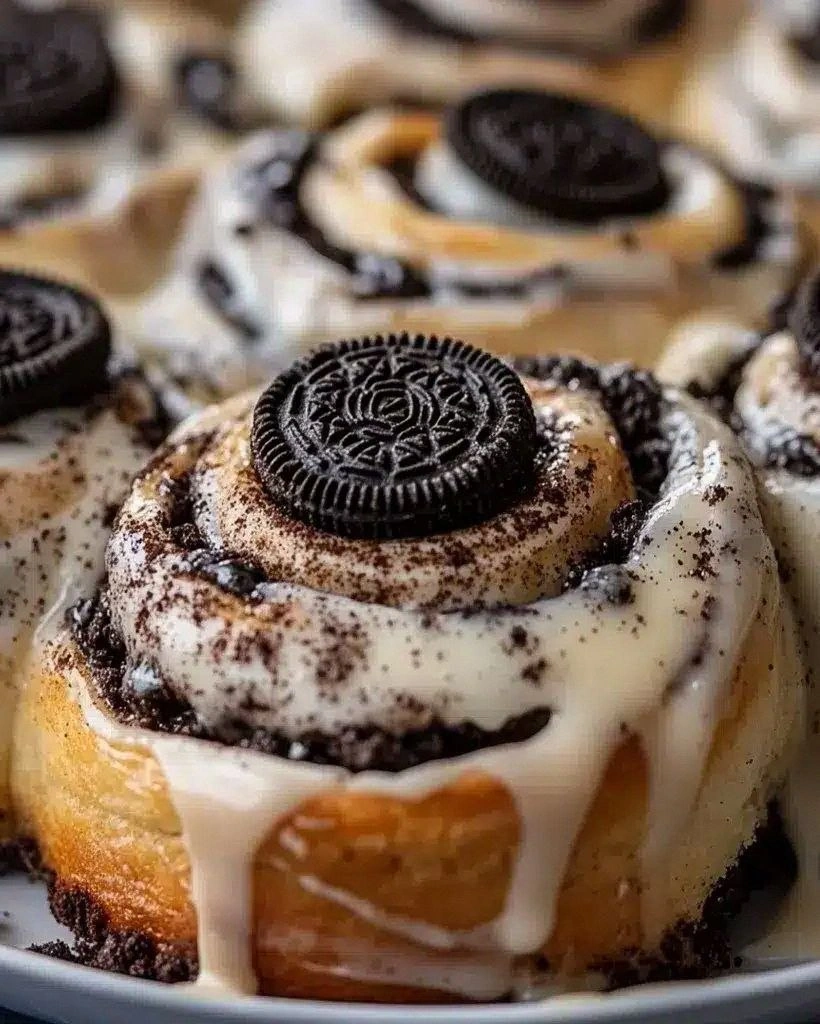
I still remember the exact moment these Oreo-stuffed cinnamon rolls were born. It was 2:47 AM on a Tuesday, I was wearing mismatched socks, and I had just demolished an entire sleeve of Oreos while stress-eating through a work deadline. The cinnamon roll dough was supposed to be for breakfast the next morning, but let's be honest — when has anyone ever successfully waited until morning to bake cinnamon rolls? As I stared at the sad, lonely package of dough and the empty Oreo sleeve, something magical happened. My sugar-addled brain whispered, "What if... what if we stuffed them together?" Thirty minutes later, I was pulling out a pan of what would become the most ridiculously indulgent thing to ever come out of my kitchen.
The first bite was a revelation. The soft, pillowy cinnamon roll gave way to a molten Oreo center that had somehow transformed into this molten cookies-and-cream lava situation. The cream cheese icing — because obviously we needed more decadence — melted into every crevice, creating these pockets of sweet, tangy perfection. I stood there in my kitchen, still in my mismatched socks, holding a half-eaten roll and wondering why nobody had told me about this combination before. This wasn't just good; this was stop-what-you're-doing-and-call-your-mom good.
Here's the thing about most cinnamon roll recipes — they're fine. They're sweet, they're warm, they're comforting. But they're also predictable. You know exactly what you're getting. These Oreo-stuffed beauties? They're a complete wildcard. They're what happens when your favorite childhood cookie grows up and decides to move in with your favorite breakfast pastry. They're the culinary equivalent of finding twenty bucks in your winter coat pocket, except better because you can eat them. And the best part? They're embarrassingly easy to make, which means you can whip them up at midnight when your sweet tooth starts staging its nightly protest.
Let me walk you through every single step — by the end, you'll wonder how you ever made it any other way.
What Makes This Version Stand Out
Oreo Explosion: We're not just crumbling Oreos on top like some amateur hour situation. We're stuffing entire cookies inside each roll, creating these molten centers that'll make you question everything you thought you knew about breakfast. The heat transforms the Oreo into this magical hybrid between cookie and fudge that's downright criminal.
Time Travel Magic: Most cinnamon roll recipes require you to make dough from scratch, proof it, roll it, and basically dedicate your entire weekend to the cause. This version uses pre-made dough because we're living in the 21st century and we've got Netflix to binge. Fifteen minutes of prep, thirty minutes of baking, zero minutes of waiting for dough to rise.
Texture Paradise: You've got the soft, pillowy roll on the outside, the molten Oreo center, the crunchy cookie bits on top, and that silky cream cheese glaze tying it all together. It's like a symphony of textures where every instrument is playing your favorite song.
Crowd Psychology: I dare you to serve these at a brunch and watch what happens. People who claim they're "not really into sweets" will suddenly develop a passionate argument for why they deserve the last one. Marriages have been strengthened over these rolls. World peace feels achievable.
Ingredient Integrity: Using real cream cheese in the icing (not that tubbed frosting nonsense) makes all the difference. It creates this tangy balance that cuts through the sweetness and keeps you from going into a complete sugar coma. Trust me, I've tested this extensively in the name of science.
Make-Ahead Champion: You can prep these the night before, stick them in the fridge, and bake them fresh in the morning. Picture yourself pulling these out of the oven, the whole kitchen smelling like a dream factory, while everyone else thinks you woke up at dawn to slave away. Your secret's safe with me.
Alright, let's break down exactly what goes into this masterpiece...
Inside the Ingredient List
The Foundation Crew
The pre-made cinnamon roll dough is your best friend here, not some shameful shortcut to hide from your foodie friends. We're using the kind that comes in a tube that pops open — yes, that Pillsbury situation that scares the life out of you every single time. Eight rolls is the perfect amount for a 9-inch round pan, and they'll snuggle together like best friends at a sleepover. If you're feeling fancy, you can use the "grands" version for extra-plump rolls, but honestly, the regular ones work perfectly. The key is getting the kind with icing included because we're about to transform that basic icing into something spectacular.
The Star Attraction
Eight Oreo cookies — not nine, not seven, but exactly eight. One for each roll, like they're going to prom together. Use the classic ones, not the double-stuffed, not the thins, not some weird seasonal flavor that tastes like sadness. The original Oreo has the perfect cookie-to-cream ratio that melts into pure magic when baked. Separate them gently; you want to keep the cream filling intact because that's what's going to create those molten pockets of joy. And here's a pro tip: don't eat any while you're prepping. I know, I know, but trust me on this one.
The Texture Team
The crushed Oreos on top aren't just for show — they provide this crucial textural contrast that takes these from good to unforgettable. When they bake, some bits stay crunchy while others melt into the glaze, creating these little Oreo freckles throughout. Use about four additional cookies, crushed into different sizes. You want some powder, some pea-sized pieces, and a few bigger chunks for maximum textural interest. This is where you can let your inner artist shine, sprinkling them like Oreo confetti across the top.
The Icing Alchemists
The cream cheese icing is where we separate the amateurs from the professionals. That little packet of icing that comes with the rolls? We're keeping it, but we're about to make it sing opera. Softened cream cheese gets whisked in until the icing becomes this silky, tangy cloud that perfectly balances all that sweetness. The powdered sugar helps achieve that perfect drizzling consistency, while the milk thins it to just the right texture — thick enough to cling to the rolls but thin enough to drip seductively down the sides. A splash of vanilla extract rounds everything out, like the bass line in your favorite song.
Special Dietary Considerations
For my gluten-free friends, this recipe works beautifully with gluten-free cinnamon roll dough — Trader Joe's makes a decent one, or you can find them in the freezer section of most upscale grocery stores. Gluten-free Oreos exist too, and they're actually pretty spectacular. For the dairy-free crowd, Kite Hill makes a cream cheese alternative that behaves beautifully in icing, and any plant-based milk will work for thinning. Vegan butter can sub in if you need to go completely animal-product-free. The recipe is surprisingly forgiving, so don't let dietary restrictions keep you from this experience.
Everything's prepped? Good. Let's get into the real action...
The Method — Step by Step
- Preheat your oven to 350°F (175°C), but don't just trust the dial — use an oven thermometer if you've got one. My oven runs hot, which I discovered after a batch of rolls that could've doubled as hockey pucks. While it's heating, grab your 9-inch round cake pan and give it a good coating of butter. Not cooking spray, not oil — butter. It creates these caramelized edges on the bottom of the rolls that'll make you want to write poetry. That sizzle when you place the rolls in the hot pan? Absolute perfection.
- Open your tube of cinnamon rolls using the method that scares you least. Some people press the seam with a spoon, others whack it on the counter like they're cracking a safe. However you do it, try not to scream when it pops — your neighbors already think you're weird enough. Separate the rolls gently; they're delicate little snowflakes at this point. Place them on a cutting board and admire their spiral beauty for a moment before we completely transform them.
- Now comes the fun part: take each Oreo and gently separate it, keeping the cream filling on one side. This is harder than it sounds because Oreos are stubborn little cookies. Work slowly, twisting rather than pulling. You'll get the hang of it by the third one. Place one Oreo half (cream side up) in the center of each cinnamon roll, pressing down slightly so it nestles into the spiral. The cream filling should be facing up like a tiny Oreo island in a sea of dough.
- Arrange the stuffed rolls in your buttered pan, starting in the center and working your way out. They should be touching but not squished — think of them as friends who like their personal space. The Oreo pieces should be facing up, creating these little peaks that'll catch all the glaze later. If you have extra space around the edges, that's fine — they'll expand and fill it during baking. This is the moment of truth where you start to realize you might be a genius.
- Bake for 25-30 minutes, but start checking at 20 minutes. You want the tops to be golden brown and the centers to look set but still slightly soft. If they start getting too brown on top before the middles are done, tent them with foil for the last 10 minutes. The Oreos will sink slightly into the rolls, creating these hidden pockets of chocolatey goodness. Your kitchen should smell like a dream factory by now — if it doesn't, check that your oven is actually on.
- While the rolls are baking, make your upgraded icing. Take that little packet of icing that came with the rolls and empty it into a bowl. Add your softened cream cheese and whisk until smooth — this takes some elbow grease, but think of it as your arm workout for the day. Add the powdered sugar, milk, and vanilla, whisking until you get a smooth, pourable consistency. It should ribbon off your whisk like liquid velvet. Taste it and try not to eat it all with a spoon.
- Let the rolls cool for exactly 5 minutes when they come out of the oven. Any longer and the glaze won't melt into all the nooks and crannies; any shorter and it'll just slide right off. Drizzle the glaze generously over the warm rolls, making sure to get it in all the crevices between the rolls. Immediately sprinkle with your crushed Oreos — they'll stick to the warm glaze like magic. Serve warm, preferably with a big glass of cold milk and zero regrets.
That's it — you did it. But hold on, I've got a few more tricks that'll take this to another level...
Insider Tricks for Flawless Results
The Temperature Rule Nobody Follows
Room temperature isn't just a suggestion — it's the difference between smooth, luscious icing and a lumpy mess that looks like cottage cheese had a bad day. Take your cream cheese out of the fridge at least an hour before you start baking. If you're impatient (I see you), you can cube it and microwave it for 10-second bursts, but watch it like a hawk. Melting cream cheese is a one-way ticket to sad town. Same goes for your milk — cold milk makes the icing seize up like it's having an anxiety attack.
Why Your Nose Knows Best
Forget timers — your nose is the most reliable baking tool you own. When these rolls are perfectly done, your kitchen will smell like someone opened a Cinnabon inside an Oreo factory. It's this heady mix of cinnamon, vanilla, and chocolate that makes you want to curl up in a blanket and hibernate. If you smell even a hint of burning sugar, get those rolls out immediately. A friend tried ignoring this rule once — let's just say her smoke alarm and I are now on a first-name basis.
The 5-Minute Rest That Changes Everything
I know you're going to want to dive in face-first the second these come out of the oven. Resist! Those five minutes of waiting aren't just for show — they're when the magic happens. The Oreo centers finish setting up, the glaze melts into every spiral, and the flavors have time to mingle and get to know each other. Cut into them too early and you'll have molten sugar lava that'll burn your tongue and ruin the experience. Too late and you'll miss that perfect warm, gooey moment. Set a timer and pace around the kitchen like a crazy person if you must.
The Secret Ingredient Nobody Expects
Add a tiny pinch of salt to your cream cheese icing. Not enough to make it salty — just enough to make people wonder why your version tastes so much more complex than theirs. Salt is the ultimate flavor amplifier; it makes the cream cheese taste creamier, the sugar taste sweeter, and the vanilla taste more vanilla-y. It's like Instagram filters for your taste buds. Start with just a pinch — you can always add more, but you can't take it out once it's in there.
The Storage Secret That Keeps Them Fresh
These rolls are best warm, but if you somehow don't eat them all in one sitting (who are you?), store them in an airtight container with a slice of bread. The bread acts like a moisture magnet, keeping the rolls soft and fresh instead of turning them into sad, dry pucks. It's like a tiny humidifier for your baked goods. Replace the bread slice every day — it'll get hard and stale while keeping your rolls perfect. This trick works for all baked goods, by the way. You're welcome.
Creative Twists and Variations
This recipe is a playground. Here are some of my favorite ways to switch things up:
Golden Oreo Sunrise Rolls
Swap out classic Oreos for Golden Oreos and add a teaspoon of lemon zest to your cream cheese icing. The result tastes like sunshine and happiness had a baby. The vanilla cookies get all caramelized and toasty, while the lemon adds this bright note that cuts through all that richness. Perfect for summer brunches when you want to pretend you're being seasonal but really you just want an excuse to eat dessert for breakfast.
Peanut Butter Cup Chaos
Replace the Oreos with mini Reese's peanut butter cups, and add a tablespoon of peanut butter to your cream cheese icing. This is what happens when a peanut butter cup and a cinnamon roll have a torrid love affair. The peanut butter gets all melty and gooey, creating these rivers of salty-sweet goodness throughout the roll. Warning: these are addictive in a way that might require an intervention.
S'mores Stuffed Dreams
Use crushed graham crackers mixed with a mini marshmallow and a piece of chocolate bar in each roll. Top with marshmallow fluff mixed into your cream cheese icing, and finish with a sprinkle of crushed graham crackers. It's like camping, but without the bugs and with significantly better breakfast options. The marshmallows puff up and get toasty, creating these little pockets of campfire magic.
White Chocolate Raspberry Romance
Stuff each roll with a white chocolate square and a teaspoon of raspberry jam, then add freeze-dried raspberry powder to your icing. This one's for when you want to feel fancy but still eat like a teenager who just discovered their parents' credit card. The tart raspberries balance the sweet white chocolate perfectly, creating this sophisticated flavor profile that'll make you feel like you should be wearing a monocle.
Salted Caramel Pretzel Plot Twist
Stuff with a Rolo and a small pretzel twist, then drizzle with homemade caramel sauce and finish with flaky sea salt. It's that perfect sweet-salty combo that makes you wonder why all desserts don't come with a salt component. The pretzels stay slightly crunchy, giving you these little bursts of salt that make the caramel taste even more caramel-y.
Coconut Macaroon Madness
Use coconut cream-filled Oreos (they exist, and they're spectacular) and add toasted coconut to your cream cheese icing. Toast the coconut yourself — the store-bought stuff is always stale and sad. This variation tastes like a tropical vacation in breakfast form. Close your eyes while eating and you can almost hear the ocean, though that might just be the sound of your arteries clogging.
Storing and Bringing It Back to Life
Fridge Storage
Store leftover rolls in an airtight container in the fridge for up to 4 days, though let's be real — they won't last that long. Line the container with paper towels to absorb excess moisture, and place a piece of bread in there to maintain humidity. The paper towel prevents sogginess while the bread keeps everything fresh. It's like a tiny climate control system for your breakfast. Reheat individual rolls in the microwave for 15-20 seconds, but add a tiny splash of water first — it creates steam that brings back that fresh-baked texture.
Freezer Friendly
These freeze beautifully, which is dangerous information to have. Wrap individual rolls tightly in plastic wrap, then aluminum foil, and freeze for up to 2 months. When the craving strikes (and it will), unwrap and microwave for 30-45 seconds from frozen. They'll taste almost as good as fresh, which is both a blessing and a curse. Pro tip: write the date on the foil with a Sharpie, because frozen rolls all look the same and nobody wants to play breakfast roulette.
Best Reheating Method
The oven is your friend here — 300°F for 8-10 minutes gets them warm and slightly crispy on the edges without drying them out. If you're in a rush (or just impatient), the microwave works with the water trick mentioned above. Never reheat these more than once — they become sad, dry shadows of their former selves. And whatever you do, don't reheat them in the pan they baked in — the sugar residue will burn and create a bitter taste that ruins everything.