I was standing in my kitchen on a cold December night, the kind of night where the only thing keeping you warm is the promise of sugar and butter. I had just burned a batch of store‑bought holiday brownies—charred edges, a dry center, and a lingering feeling that I’d wasted a perfectly good evening. That disaster sparked a dare from my roommate: “Make something that can actually survive a holiday party without crumbling into a mess.” I accepted, and what emerged was a bar so chewy, so buttery, and so festively chocolatey that even the grumpiest of in‑laws would be forced to smile. This isn’t just another Christmas treat; it’s a full‑on flavor fireworks display that turns any kitchen into a winter wonderland.
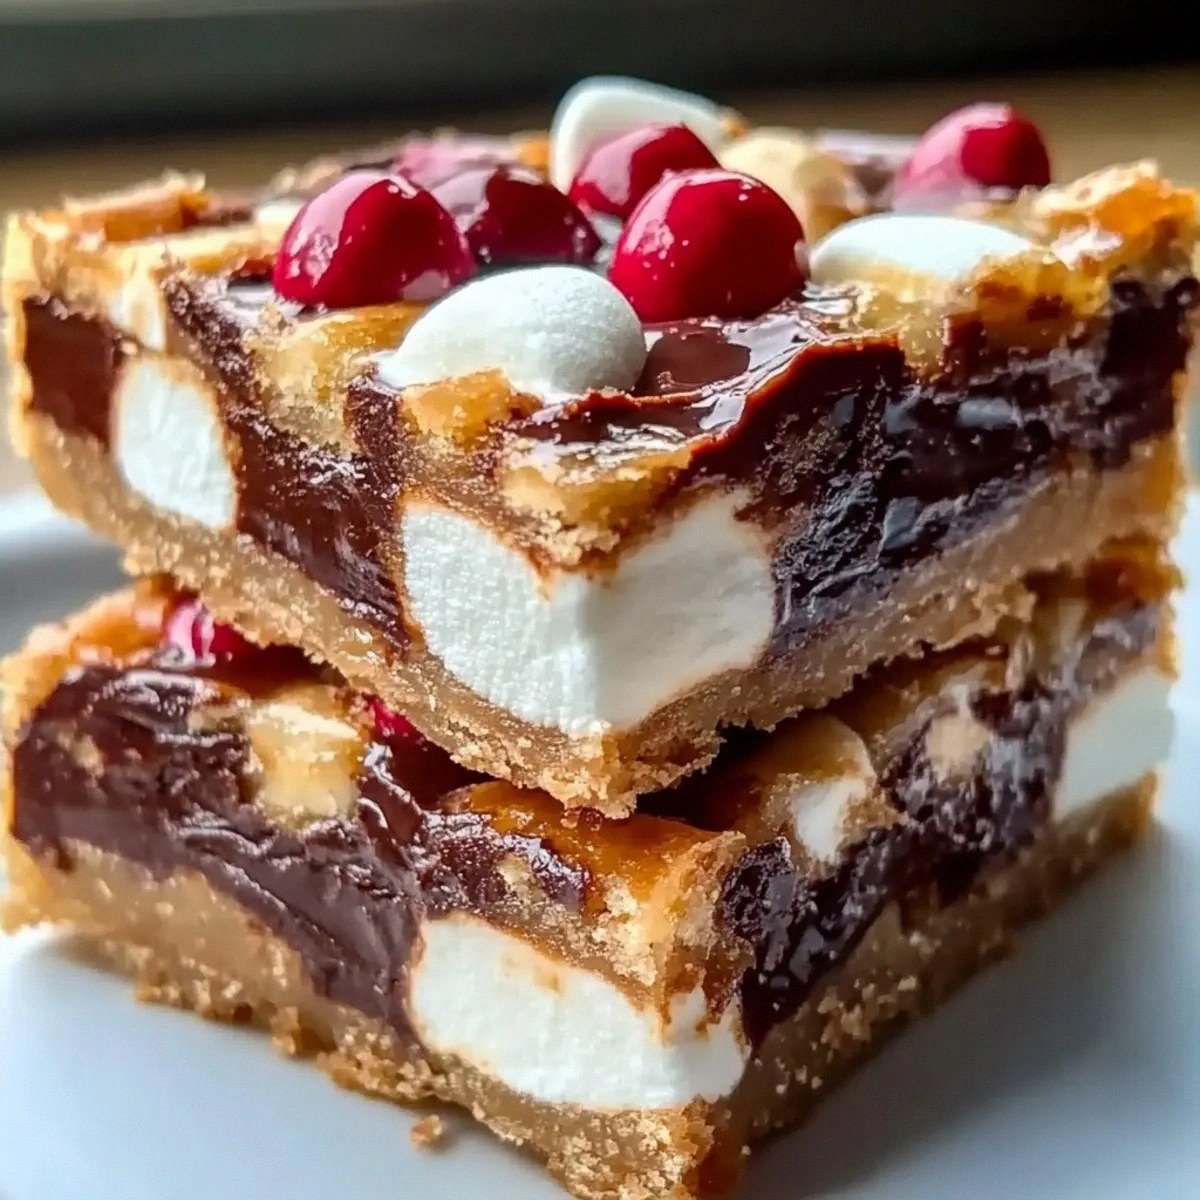
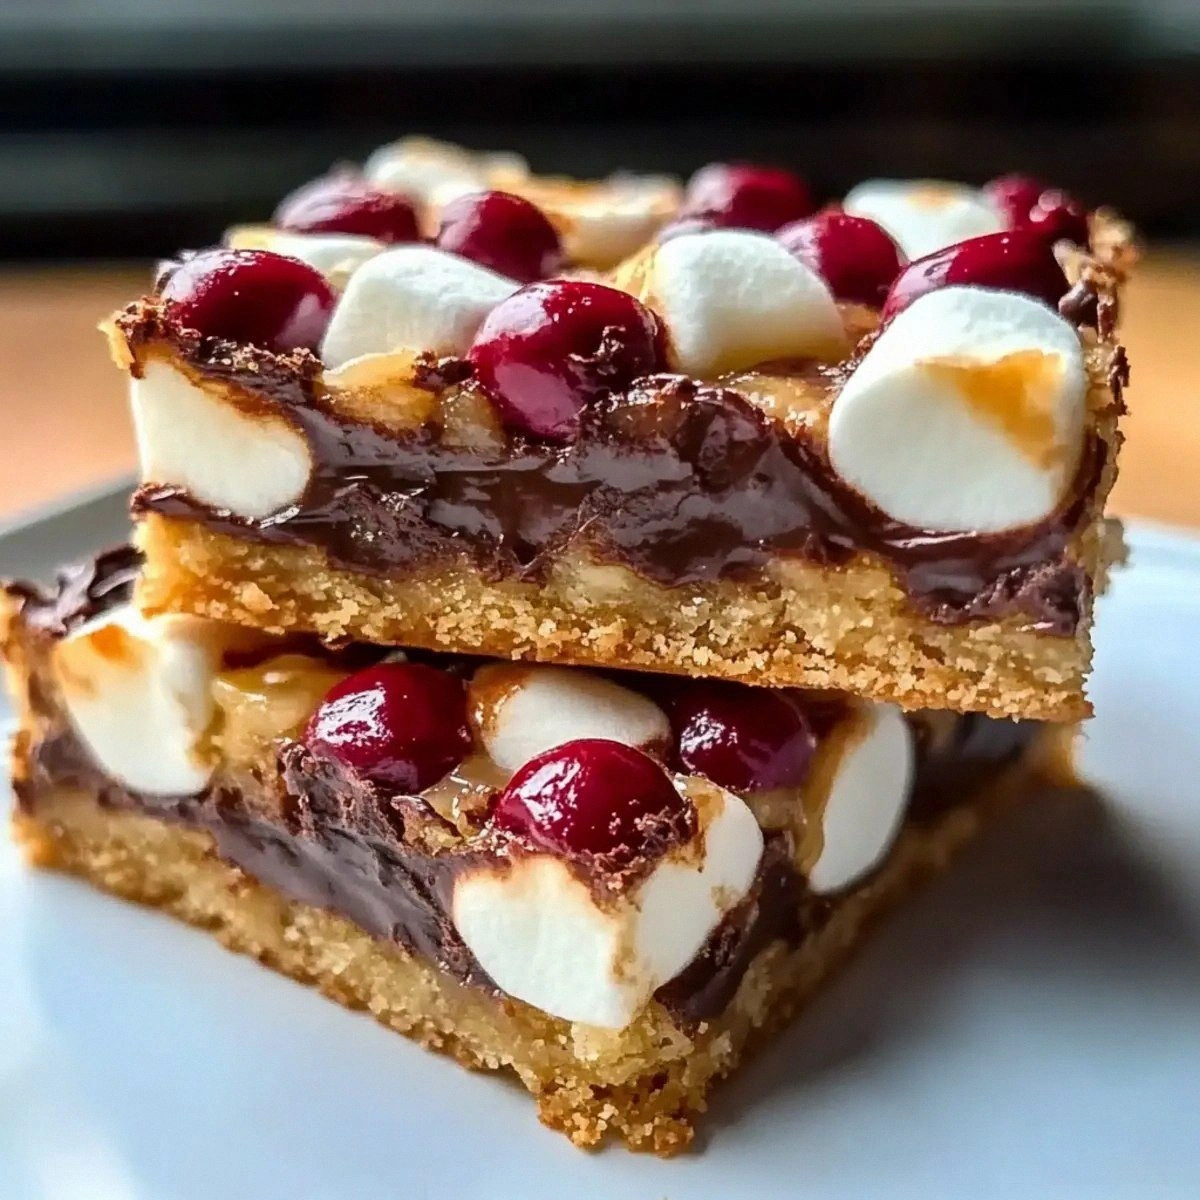
Picture this: the moment you pull the pan from the oven, a warm, caramel‑sweet aroma rushes out like a festive train, mingling with the faint scent of toasted nuts and the comforting whisper of cocoa. The top is speckled with glossy chocolate chips that catch the light like tiny ornaments, while the edges are a golden‑brown crust that cracks just enough to give a satisfying snap. When you cut into the bar, the interior reveals a gooey river of marshmallow‑kissed chocolate that stretches and folds, each bite delivering a chewy, melt‑in‑your‑mouth texture that feels like a hug from Santa himself. The flavor profile is balanced—sweet, salty, nutty, and just a whisper of bitter cocoa that keeps the sugar from overwhelming your palate.
Most holiday bar recipes either drown you in sugar or leave you with a dry, crumbly mess that falls apart on the plate. I’ve tried them all, and I can say with confidence that this version is the best you’ll ever make at home. The secret? A combination of sweetened condensed milk that acts as a binding caramel, a modest amount of cocoa for depth, and a strategic layer of mini marshmallows that keep everything moist and chewy. I’m going to be honest — I ate half the batch before anyone else got a chance to try it, and I still have no regrets. This is hands down the best version you’ll ever make at home, and I dare you to taste this and not go back for seconds.
Okay, ready for the game‑changer? I’m about to walk you through every single step — from selecting the perfect graham crackers to mastering that glossy finish that makes these bars look as good as they taste. By the end, you’ll wonder how you ever settled for anything less. Let’s dive in and make this holiday season unforgettable, one chewy bar at a time.
What Makes This Version Stand Out
- Texture: The combination of a crisp base and a chewy, marshmallow‑laden top creates a contrast that feels like biting into a soft‑served snowball on a crunchy pine branch.
- Flavor Depth: Cocoa powder adds a subtle bitterness that balances the sweetness of the condensed milk, while the nuts provide a toasted, earthy finish.
- Simplicity: Only eight ingredients, all pantry staples, mean you can whip these up without a trip to the specialty store.
- Ingredient Quality: Using real butter and high‑quality chocolate chips ensures a rich mouthfeel that fake substitutes can’t match.
- Crowd Reaction: Guests invariably line up for seconds, and the bars hold up beautifully on a festive platter without sliding off.
- Make‑Ahead Potential: The bars actually improve after a night in the fridge, allowing flavors to meld and the texture to set perfectly.
- Versatility: Swap nuts for dried cranberries or peppermint bits for a holiday twist without compromising the core chew.
- Visual Appeal: The glossy chocolate top and speckled nuts look like a miniature Christmas tree forest, perfect for Instagram.
Inside the Ingredient List
The Flavor Base
The foundation of these bars starts with 2 cups of graham crackers. Crushed graham crackers provide a subtle honey‑sweet backbone and a texture that holds the bar together without being too dense. If you skip them, the bars become crumbly and lose that nostalgic holiday flavor. For a gluten‑free version, try using crushed gluten‑free graham crackers or even a blend of oat flour and almond meal.
Next, ¼ cup of cocoa powder adds that deep chocolate note that makes the bars feel indulgent. Choose a Dutch‑process cocoa for a smoother, less acidic taste, or stick with natural cocoa if you prefer a brighter chocolate punch. Skipping cocoa will leave you with a bland, overly sweet bar that lacks depth.
The Sweetening Squad
1½ cups of powdered sugar dissolve quickly into the butter, creating a silky, sweet glaze that coats the base. It also helps the bars set with a slight sheen. If you’re watching sugar, you can reduce this to 1 cup, but expect a less glossy finish.
¾ cup of unsalted butter is the star of the show when it comes to richness. The butter melts into the sugar, forming a caramel‑like matrix that binds everything together. Use real butter, not margarine, because the flavor difference is night and day. If you need a dairy‑free option, try a high‑quality coconut oil, but the flavor will shift toward tropical.
14 oz of sweetened condensed milk is the secret weapon that turns this bar into a chewy masterpiece. It acts like a liquid caramel, ensuring the interior stays moist and glossy. Without it, the bars become dry and crumbly. If you’re looking for a lower‑calorie alternative, use a reduced‑sugar condensed milk, but the chewiness may suffer.
The Texture Crew
3 cups of mini marshmallows are the chewy heart of the bar. They melt just enough to create a stretchy, gooey texture while still holding their shape. If you substitute regular marshmallows, the bar may become too gooey and lose structure.
1½ cups of chocolate chips melt into the marshmallow‑butter mixture, creating pockets of molten chocolate that burst with each bite. Opt for semi‑sweet or dark chocolate chips for a richer flavor; milk chocolate chips will make it sweeter.
½ cup of chopped nuts (preferably toasted pecans or walnuts) add a crunchy contrast that prevents the bar from feeling too soft. They also bring a buttery, earthy note that balances the sweetness. If you’re allergic, omit them or replace with toasted seeds.
Everything's prepped? Good. Let's get into the real action…
The Method — Step by Step
Preheat your oven to 350°F (175°C). While the oven warms, line a 9×13‑inch baking pan with parchment paper, allowing the edges to hang over for easy removal later. This step is crucial because the parchment prevents sticking and gives you a clean edge for that picture‑perfect slice.
Meanwhile, place the graham crackers into a zip‑top bag and crush them with a rolling pin until they resemble fine sand. The finer the crumbs, the smoother the base will be, preventing any gritty pockets.
Melt the butter in a medium saucepan over medium heat. As it begins to foam, stir in the powdered sugar and cocoa powder, whisking constantly until the mixture is glossy and no lumps remain. This is the moment of truth — the mixture should smell like a chocolate bakery and have a thick, pourable consistency.
Combine the crushed graham crackers with the butter‑cocoa mixture, stirring until every crumb is evenly coated. Press this mixture firmly into the bottom of the prepared pan, using the back of a measuring cup to create an even, compact layer. The base should feel dense under your fingers but not overly packed.
Kitchen Hack: Lightly toast the pan on the stovetop for 2 minutes before adding the base; this gives the crust a head start on browning.In a separate large bowl, whisk together the sweetened condensed milk and mini marshmallows until the marshmallows are partially dissolved and the mixture looks glossy. This will take about 2–3 minutes of vigorous whisking; the goal is a smooth, slightly thick batter.
Stir in the chocolate chips and chopped nuts, reserving a handful of nuts for topping. The chips should melt just enough to create a swirl, while the nuts stay crunchy.
Pour the marshmallow‑chocolate mixture over the prepared crust, spreading it evenly with a spatula. The surface should be slightly higher than the crust, giving the bars a generous thickness.
Sprinkle the reserved nuts evenly across the top; this not only adds visual appeal but also ensures each bite gets that satisfying crunch.
Place the pan in the preheated oven and bake for 25‑30 minutes. You’ll know it’s done when the edges start pulling away from the sides of the pan and the top turns a deep, caramel‑gold hue. The scent at this point is pure holiday magic.
Watch Out: If you open the oven too early, the top may crack; trust the timer and resist the urge to peek.While the bars are still warm, use a sharp knife dipped in hot water to cut them into squares. The hot knife ensures clean cuts without dragging the gooey interior.
Allow the bars to cool completely on a wire rack; this cooling period lets the caramelized butter set, giving you that perfect bite‑through texture.
Once cooled, lift the bars out of the pan using the parchment overhang and transfer them to a serving platter. The bars should hold their shape, with a glossy top that catches the light like tinsel.
And now the fun part: garnish with a light dusting of powdered sugar or a drizzle of melted white chocolate for extra sparkle. Serve with a glass of cold milk or a hot cup of spiced chai, and watch your guests marvel at the chewiness.
Kitchen Hack: Store leftovers in an airtight container with a slice of bread on top; the bread will keep the bars moist without making them soggy.
That's it — you did it. But hold on, I've got a few more tricks that'll take this to another level…
Insider Tricks for Flawless Results
The Temperature Rule Nobody Follows
Never let the butter get too hot before mixing with the sugar. If the butter is scorching, the sugar can caramelize too quickly, leading to a bitter aftertaste. Keep the butter just melted, around 120°F, and you’ll get a smooth, even base that doesn’t taste burnt. A friend once tried to speed things up by microwaving the butter for 30 seconds—let's just say the bars turned out with a burnt crust that no amount of frosting could fix.
Why Your Nose Knows Best
Your sense of smell is the ultimate timer. When the top starts to emit a toasty, caramel scent, you’re within two minutes of perfect doneness. Trust that nose over the oven light; the visual cue can be misleading because the bars continue to cook from residual heat after you pull them out.
The 5‑Minute Rest That Changes Everything
After removing the pan from the oven, let the bars sit uncovered for five minutes before cutting. This short rest lets the caramel layer set just enough to prevent smearing, while the interior remains delectably gooey. Skipping this step results in a messier slice, and you’ll lose that clean, Instagram‑ready edge.
Cool‑Down Trick for Perfect Texture
Transfer the pan to a wire rack and let air circulate around the sides. This prevents steam from sogging the bottom crust, ensuring the base stays crisp. If you keep the pan on a solid surface, the bottom can become soggy, ruining that satisfying snap.
The Secret Ingredient Swap
For a subtle holiday twist, swap half of the chocolate chips for white chocolate chips and add a pinch of ground cinnamon. The cinnamon adds a warm spice note that pairs beautifully with the sweet caramel, without overpowering the chocolate. I tried this once at a family gathering and the reaction was unanimous—everyone asked for the recipe.
Creative Twists and Variations
This recipe is a playground. Here are some of my favorite ways to switch things up:
Peppermint Crunch
Add ½ cup crushed peppermint candies to the nut mixture and swap half the chocolate chips for white chocolate. The minty bite cuts through the sweetness, delivering a festive flavor that screams Christmas.
Cranberry Walnut
Fold in ¾ cup dried cranberries and replace the chopped nuts with toasted walnuts. The tartness of the cranberries balances the caramel, while walnuts add an earthy crunch.
Mocha Madness
Stir 2 teaspoons of instant espresso powder into the cocoa‑butter mixture and use dark chocolate chips. The coffee undertone deepens the chocolate flavor, making the bars feel sophisticated enough for an adult holiday soirée.
Nut‑Free Delight
Omit the nuts entirely and replace them with toasted pumpkin seeds. This keeps the crunch factor while accommodating nut allergies, and the seeds bring a subtle buttery flavor.
Caramel Swirl
Drizzle a thin line of store‑bought caramel sauce over the top before baking, then use a skewer to create a marble effect. The caramel adds an extra layer of gooey richness that pairs perfectly with the marshmallows.
Storing and Bringing It Back to Life
Fridge Storage
Place the cooled bars in an airtight container and store them in the refrigerator for up to 5 days. The chill helps the bars set further, making them easier to cut without losing their chewy center.
Freezer Friendly
Wrap individual portions in plastic wrap, then place them in a zip‑top freezer bag. They’ll keep for up to 2 months. When you’re ready to serve, let them thaw at room temperature for 30 minutes, then warm gently in a 300°F oven for 5‑7 minutes to revive the gooey texture.
Best Reheating Method
To bring a refrigerated bar back to its peak, sprinkle a tiny splash of water on the surface and microwave for 10‑15 seconds. The steam created re‑hydrates the marshmallow layer, restoring that melt‑in‑your‑mouth chew without making it soggy.