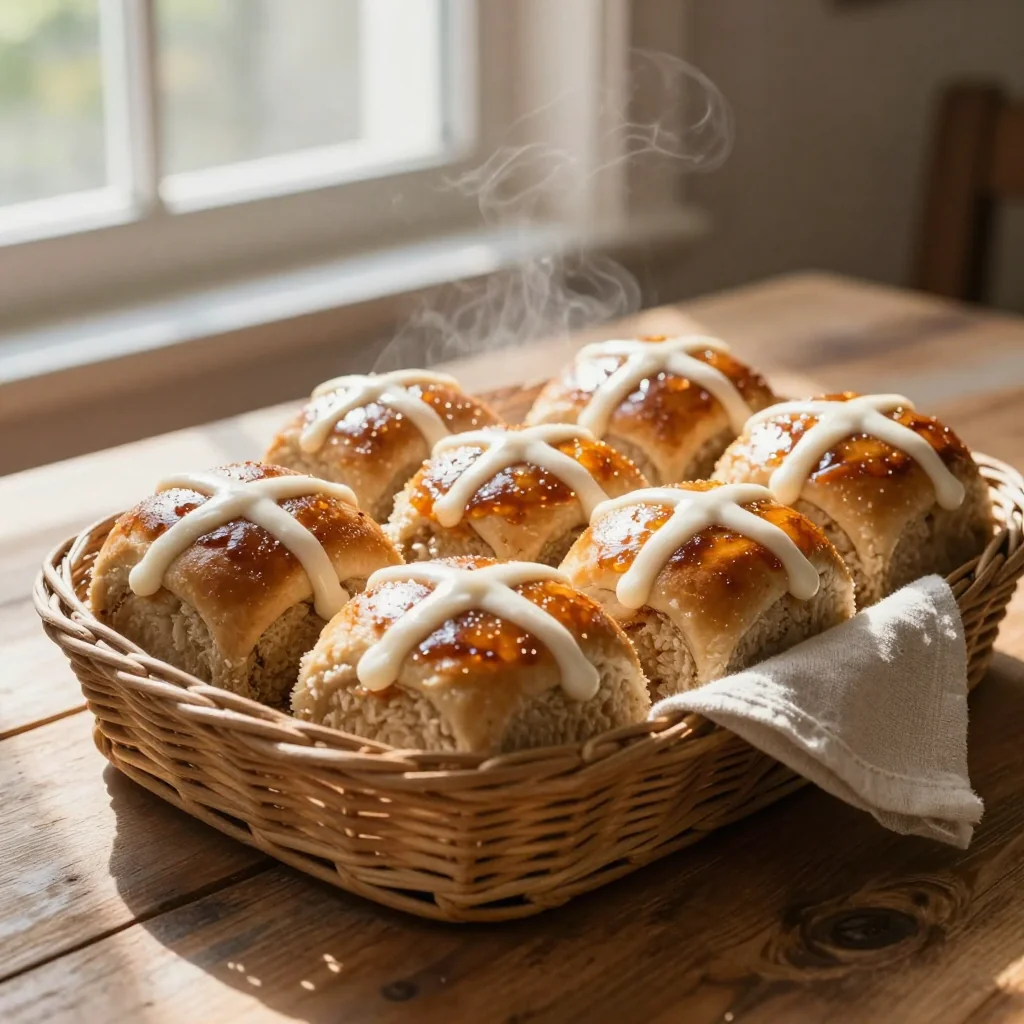
Hommade Hot Cross Buns with Sweet Icing
Warm, spiced buns dotted with raisins, crowned with a sweet glaze – perfect for any celebration.
When I was a child, my grandmother would rise before dawn to bake a batch of fragrant hot cross buns for Easter Sunday. The kitchen would fill with the scent of cinnamon, nutmeg, and sweet orange peel, and the whole family would gather around the table, eager for the first warm bite. Those mornings remain etched in my memory, a blend of anticipation, love, and the soft, buttery texture that seemed to melt on the tongue.
Hot cross buns have a centuries‑old tradition, originating from ancient pagan rituals that celebrated the spring equinox. Over time, they became a staple of Christian Easter celebrations across the United Kingdom and beyond, each bun marked with a symbolic cross to represent the crucifixion. Today, they’re enjoyed year‑round, often as a comforting breakfast or an indulgent snack.
In this article, I’ll walk you through a foolproof method that yields perfectly fluffy buns with a tender crumb, studded with plump raisins and sweet candied orange peel. You’ll also learn how to create a glossy icing that adds just the right amount of sweetness without overpowering the spices.
Let’s dive into the process together, and I promise you’ll be pulling a golden, aromatic loaf from the oven that will impress family and friends alike.
🌟 Why This Recipe Will Capture Your Heart
These buns are more than just a holiday treat—they’re a warm hug in baked form, perfect for any occasion.
- ✨ Irresistible Flavor Balance: The sweet raisins and citrusy candied peel complement the warm spices, creating a harmonious taste that lingers.
- ✨ Foolproof Texture: A soft, pillowy interior with a lightly crisp crust ensures every bite is delightfully satisfying.
- ✨ Simple Ingredients: All components are pantry staples, making this recipe accessible for home cooks of any skill level.
- ✨ Customizable Icing: The sweet glaze can be tweaked with lemon zest or vanilla for personal flair.
- ✨ Perfect for Gatherings: Their individual size makes them ideal for brunch tables, picnics, or holiday spreads.
- ✨ Timeless Tradition: By honoring a historic recipe while adding modern twists, you keep culinary heritage alive.
🥗 The Ingredients
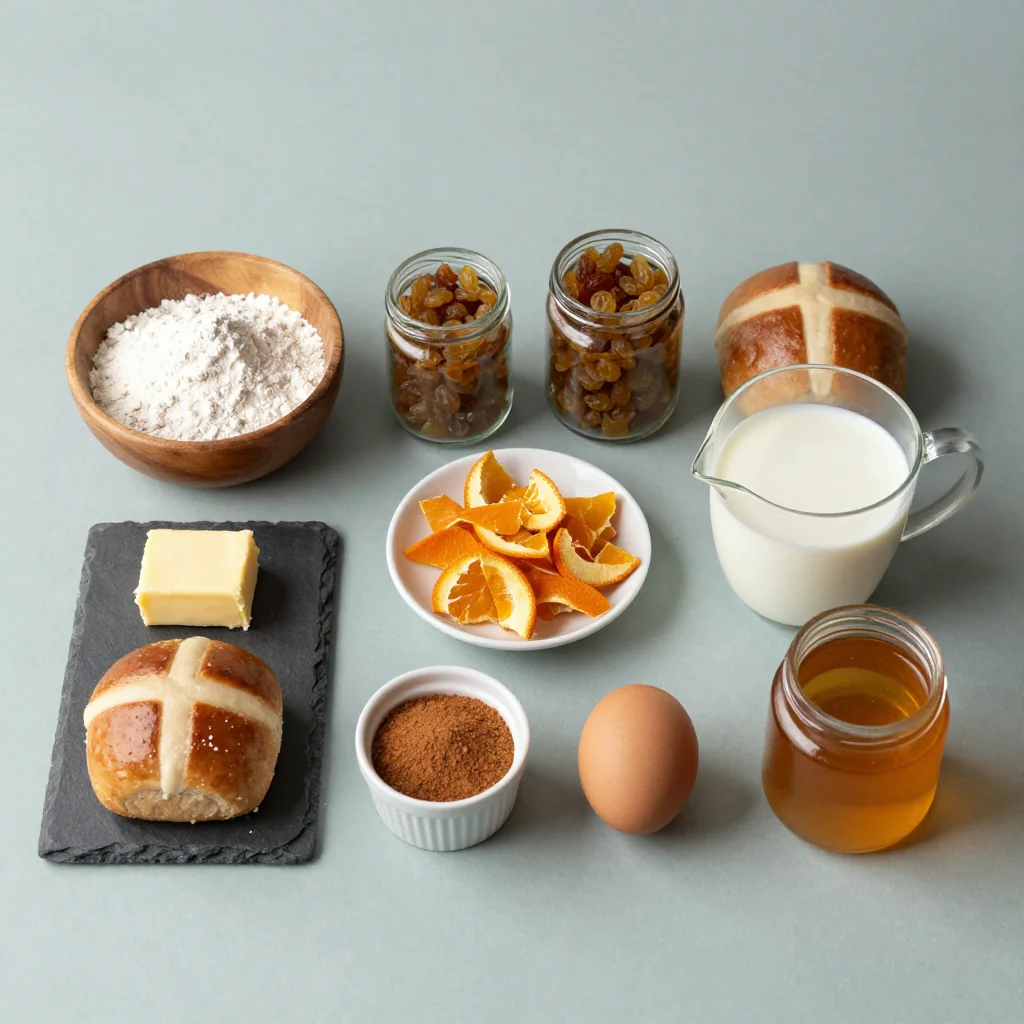
📝 Complete Ingredient List
For the Dough:
For the Filling:
For the Sweet Icing:
🔍 Focus on Key Ingredients
All‑Purpose Flour
Flour provides the structure for the buns. Using a high‑protein flour (around 12% protein) yields a slightly chewier crumb, while a lower‑protein flour gives a softer, more tender texture. For classic hot cross buns, a standard all‑purpose flour works perfectly, offering a balanced gluten network that traps the gases produced during fermentation.
Active Dry Yeast
Yeast is the engine of the rise. Active dry yeast is reliable and easy to store. Be sure to dissolve it in warm milk (around 38 °C/100 °F) to activate it. If the mixture becomes frothy after a few minutes, you know the yeast is alive and ready to work.
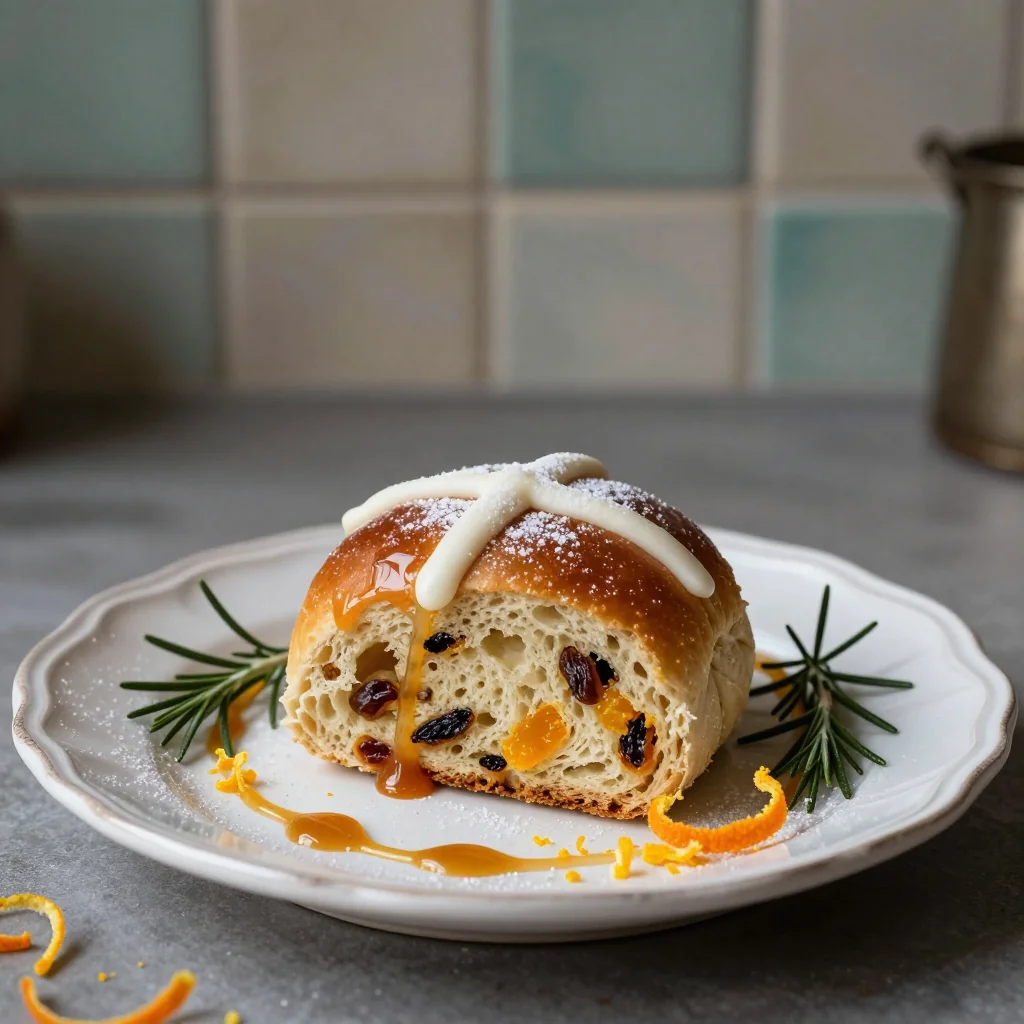
Candied Orange Peel
The orange peel adds a bright, citrusy contrast to the deep spices. Its subtle sweetness and chewy texture complement the raisins, providing bursts of flavor that cut through the richness of the dough.
🔄 Quick Substitutions
| If you don’t have… | Use instead… |
|---|---|
| All‑purpose flour | Bread flour (use 5 % less) |
| Active dry yeast | Instant yeast (same amount) |
| Candied orange peel | Raisins + a splash of orange zest |
👨🍳 Step‑by‑Step Instructions
Follow these detailed steps to achieve perfectly risen, aromatic buns with a glossy finish.
📋 Phase 1: Preparation & Mise en Place
Gather all ingredients, measure precisely, and set up a clean workspace.
Activate the Yeast
In a small bowl, combine warm milk (38 °C/100 °F) with the sugar and sprinkle the yeast over the surface. Let it sit for 5‑7 minutes until it becomes foamy, indicating that the yeast is alive and ready.
Combine Dry Ingredients
In a large mixing bowl, whisk together flour, ground cinnamon, ground nutmeg, and a pinch of salt. Create a well in the center to hold the yeast mixture.
🔥 Phase 2: Mixing, Kneading & First Rise
Turn the dough into a smooth, elastic ball and let it double in size.
Incorporate Wet Ingredients
Add the melted butter, beaten egg, and the foamy yeast mixture into the dry ingredients. Stir with a wooden spoon until a shaggy dough forms. The dough will appear slightly sticky but manageable.
Knead the Dough
Transfer the dough onto a lightly floured surface. Knead for 8‑10 minutes, folding and pushing the dough away from you, then turning it 90 degrees. The dough should become smooth, elastic, and slightly tacky.
First Proof
Place the kneaded dough into a lightly greased bowl, cover with a clean kitchen towel, and let it rise in a warm spot for 1‑1.5 hours, or until it has doubled in volume.
✨ Phase 3: Shaping, Baking & Finishing
Shape the buns, bake them to golden perfection, and glaze them while still warm.
Shape the Buns
Turn the risen dough onto a lightly floured surface, gently deflate, and divide into 12 equal pieces (about 80 g each). Shape each piece into a smooth ball, then place them on a parchment‑lined baking tray, leaving a little space between each.
Second Proof
Cover the tray loosely with a clean kitchen towel and let the buns rise for another 30‑45 minutes, until they look puffed and airy.
Make the Crosses
Mix 2 tbsp of plain flour with 2 tbsp of water to form a thick paste. Transfer the paste to a piping bag or a zip‑lock bag with a tiny corner cut off. Pipe a thin cross onto each bun.
Bake
Preheat the oven to 190 °C (375 °F). Bake the buns for 15‑18 minutes, until they are deep golden‑brown and sound hollow when tapped on the bottom.
Glaze
While the buns are still warm, whisk together powdered sugar, milk, and vanilla extract. Drizzle the glaze over the tops of the buns, allowing it to set slightly before serving.
💡 Expert Tips & Tricks
🛒 Choosing the Best Ingredients
Opt for high‑quality butter with at least 80 % butterfat for a richer flavor. Fresh, plump raisins retain moisture better than older, dried ones. When selecting candied orange peel, choose pieces that are not overly sugary; a light dusting of powdered sugar on the peel helps balance sweetness.
🔪 Preparation Techniques
When kneading, keep your hands lightly floured to prevent sticking, but avoid adding too much extra flour, which can make the buns dense. Use a bench scraper to lift the dough cleanly from the work surface, preserving its airy structure.
🌡️ Mastering the Bake
Position the baking tray in the middle of the oven for even heat distribution. If your oven tends to brown quickly, tent the buns with foil after the first 10 minutes to prevent over‑browning while the interior finishes cooking.
🍽️ Presentation & Service
Serve the buns slightly warm, accompanied by a dollop of clotted cream or a thin spread of butter. For a festive touch, dust the tops with a light sprinkle of cinnamon sugar just before serving.
🏆 Pro Tips
Professional bakers focus on precision, temperature control, and timing to achieve bakery‑level results.
- 🎯 Temperature Consistency: Use a digital thermometer to ensure your milk is at the optimal 38 °C (100 °F). This temperature activates yeast without killing it, leading to a reliable rise.
- 🎯 Autolyse Method: Allow the flour and water to rest for 20‑30 minutes before adding yeast. This encourages gluten development and results in a softer crumb.
- 🎯 Steam Injection: Place a small pan of water on the lower rack while baking. The steam creates a glossy crust and helps the buns rise evenly.
- 🎯 Proper Scoring: Use a sharp blade to cut the cross; a clean cut prevents tearing and ensures the cross stays defined.
- 🎯 Icing Consistency: Adjust the milk in the glaze until it reaches a pourable but thick consistency. Too thin and the glaze will run off; too thick and it won’t spread.
- 🎯 Cooling Technique: Transfer baked buns to a wire rack after glazing; this prevents the underside from becoming soggy.
"The secret to perfect hot cross buns lies in patience, precise measurements, and a love for the spice‑laden aroma that fills the kitchen." — Paul Hollywood
🔄 Variations & Adaptations
Feel free to experiment with flavors, textures, and dietary needs while keeping the core of the recipe intact.
🥬 Vegetarian/Vegan Version
Replace the egg with a flaxseed “egg” (1 tbsp ground flaxseed mixed with 3 tbsp water) and use plant‑based milk such as oat or almond. Swap butter for a high‑quality vegan margarine. The texture remains soft, and the flavor is unchanged.
- Flaxseed “egg” – binds and adds moisture.
- Vegan margarine – provides richness without dairy.
🌶️ Flavor Variations
Explore different cultural twists by adjusting the spice blend or adding complementary ingredients.
Spicy Chili Version
Add ½ tsp of ground cayenne pepper to the dough and a pinch of smoked paprika for a subtle heat that pairs wonderfully with the sweetness.
Mediterranean Olive & Herb Version
Swap raisins for chopped Kalamata olives and add 1 tsp of dried oregano. Finish with a drizzle of olive oil before baking.
Asian‑Inspired Sesame & Ginger Version
Replace the orange peel with toasted sesame seeds and add 1 tsp of freshly grated ginger. Top with a light glaze of honey mixed with soy sauce for a sweet‑savory finish.
⚠️ Dietary Adaptations
Gluten‑Free
Use a blend of rice flour, tapioca starch, and xanthan gum (approximately 2 cups of a gluten‑free flour mix). Add 1 tsp of xanthan gum to improve elasticity.
Lactose‑Free
Swap regular milk for lactose‑free milk or oat milk, and replace butter with a lactose‑free spread.
Low‑Calorie
Reduce sugar by 25 % and replace half of the butter with unsweetened applesauce. This cuts calories while maintaining moisture.
👶 Kid‑Friendly Version
For picky eaters, reduce the amount of spices to a pinch of cinnamon, omit the orange peel, and add a few chocolate chips. Kids love the sweet, chocolate‑y surprise.
📦 Storage & Reheating
🧊 Conservation
In the Refrigerator
- Duration: 5 days
- Recommended container: airtight plastic container
- Tip: Place a paper towel at the bottom to absorb excess moisture.
In the Freezer
- Duration: 3 months
- Method: Wrap each bun individually in parchment paper, then place in a zip‑lock bag.
- Defrosting: Transfer to the refrigerator overnight, then warm gently.
💡 For best flavor, consume within two weeks of freezing.
♨️ Reheating
Oven (Recommended)
- Preheat to 180 °C (350 °F).
- Cover buns loosely with foil.
- Reheat for 8‑10 minutes.
- Remove foil and continue for 2‑3 minutes for a crisp crust.
Microwave (Quick)
- Place bun on a microwave‑safe plate.
- Cover with a damp paper towel.
- Heat on medium power for 30‑45 seconds.
- Check and add another 15 seconds if needed.
Stovetop
Heat a non‑stick pan over low heat, add a splash of water, and cover. Warm for 3‑4 minutes, flipping halfway.
🍷 Perfect Pairings
🥗 Side Dishes
- Fresh Mixed Greens: Lightly dressed with lemon vinaigrette, the acidity balances the sweet buns.
- Roasted Asparagus: A touch of olive oil and sea salt adds a savory contrast.
- Cheese Platter: Soft brie or sharp cheddar pairs beautifully with the sweet glaze.
🍷 Wine & Beverage Pairings
- Dry Riesling: Its crisp acidity cuts through the sweetness while complementing the spices.
- Light Amber Ale: The malt notes echo the warm spices in the buns.
- Non‑Alcoholic Sparkling Apple Cider: Refreshing and festive, perfect for family gatherings.
🍰 Complementary Courses
Start with a light vegetable soup or a fresh fruit salad, then follow the buns with a delicate lemon tart for a bright finish. The contrast of citrus in the tart highlights the sweet icing.
❓ Frequently Asked Questions
Q: Can I use whole‑wheat flour instead of all‑purpose?
A: Yes, you can substitute up to 50 % whole‑wheat flour. Replace half of the all‑purpose flour with whole‑wheat, and consider adding an extra 2‑3 tbsp of milk to keep the dough moist, as whole‑wheat absorbs more liquid.
Q: How do I know when the dough has risen enough?
A: After the first rise, the dough should have at least doubled in size. A quick test is the “finger poke”: gently press a fingertip into the dough—if the indentation slowly springs back, it’s ready. If it springs back quickly, give it more time.
Q: What if I don’t have candied orange peel?
A: Use a mixture of finely chopped dried apricots and a teaspoon of orange zest. The apricots provide chewiness, while the zest supplies the citrus aroma.
Q: My buns turned out dense. What went wrong?
A: Common causes include over‑mixing, using cold liquids, or an inactive yeast. Ensure the milk is warm, not hot, and give the dough enough time to rise. Avoid adding too much flour during kneading.
Q: Can I add nuts or other dried fruit?
A: Absolutely! Chopped walnuts, pecans, or dried cranberries can be added to the filling. Toast walnut pieces for extra crunch, and toast nuts lightly before folding them in.
Q: How far in advance can I prepare the dough?
A: You can make the dough a day ahead and let it rise slowly in the refrigerator overnight. Shape the buns the next morning, let them come to room temperature, and bake as usual.
🎉 Let’s Get Baking!
These homemade hot cross buns with sweet icing are a celebration of tradition, flavor, and the joy of sharing. Whether you’re preparing them for Easter, a weekend brunch, or simply a cozy afternoon tea, the aromatic spices, juicy raisins, and glossy glaze will make every bite unforgettable. The recipe is designed to be approachable for home bakers while still delivering bakery‑quality results.
Give it a try, experiment with the variations, and don’t forget to share your beautiful creations. Your feedback helps refine the recipe, and seeing your photos inspires other food lovers.
Have you tried this recipe?
Leave a comment and rating below! Share your photos on Instagram with #HotCrossBunLove to be featured on our site.
Homemade Hot Cross Buns with Sweet Icing
Soft, spiced buns topped with a glossy sweet glaze—perfect for any celebration.
📝 Ingredients
For the Dough
For the Filling
For the Sweet Icing
👨🍳 Instructions
- 1
Activate the yeast by mixing warm milk, sugar, and yeast; let foam.
- 2
Whisk together flour, cinnamon, nutmeg, and salt.
- 3
Add melted butter, beaten egg, and the yeast mixture to the dry ingredients and stir until a shaggy dough forms.
- 4
Knead the dough for 8‑10 minutes until smooth and elastic.
- 5
Let the dough rise until doubled, about 1‑1.5 hours.
- 6
Fold in raisins and candied orange peel, then divide into 12 equal pieces.
- 7
Shape each piece into a ball, place on a tray, and let rise again for 30‑45 minutes.
- 8
Pipe a thin cross onto each bun using a flour‑water paste.
- 9
Bake at 190 °C (375 °F) for 15‑18 minutes until golden.
Glaze
While warm, drizzle the sweet icing made from powdered sugar, milk, and vanilla.
🥗 Nutritional Information (per serving)
*Nutritional values are estimates based on typical ingredient quantities.
📚 You Might Also Like
Classic Scones with Clotted Cream
Classic English Scones
Spiced Cinnamon Swirl Bread


💬 Comments & Reviews
Leave a Comment
No comments yet – be the first to share your experience!