I was standing in my kitchen, staring at a pan that looked like a battlefield after a failed attempt at a classic apple upside‑down cake. The caramel had hardened into a rock, the apples were mushy, and the cake itself was as flat as a pancake that had been left out in the rain. I swear I heard my neighbor’s dog yelp in sympathy. Then a friend dared me, “Make it so good that people will line up at your door for seconds.” I laughed, but the challenge lit a fire under me. I dove back into the pantry, grabbed the freshest Granny Smiths I could find, and started over with a plan to turn that disaster into a masterpiece.
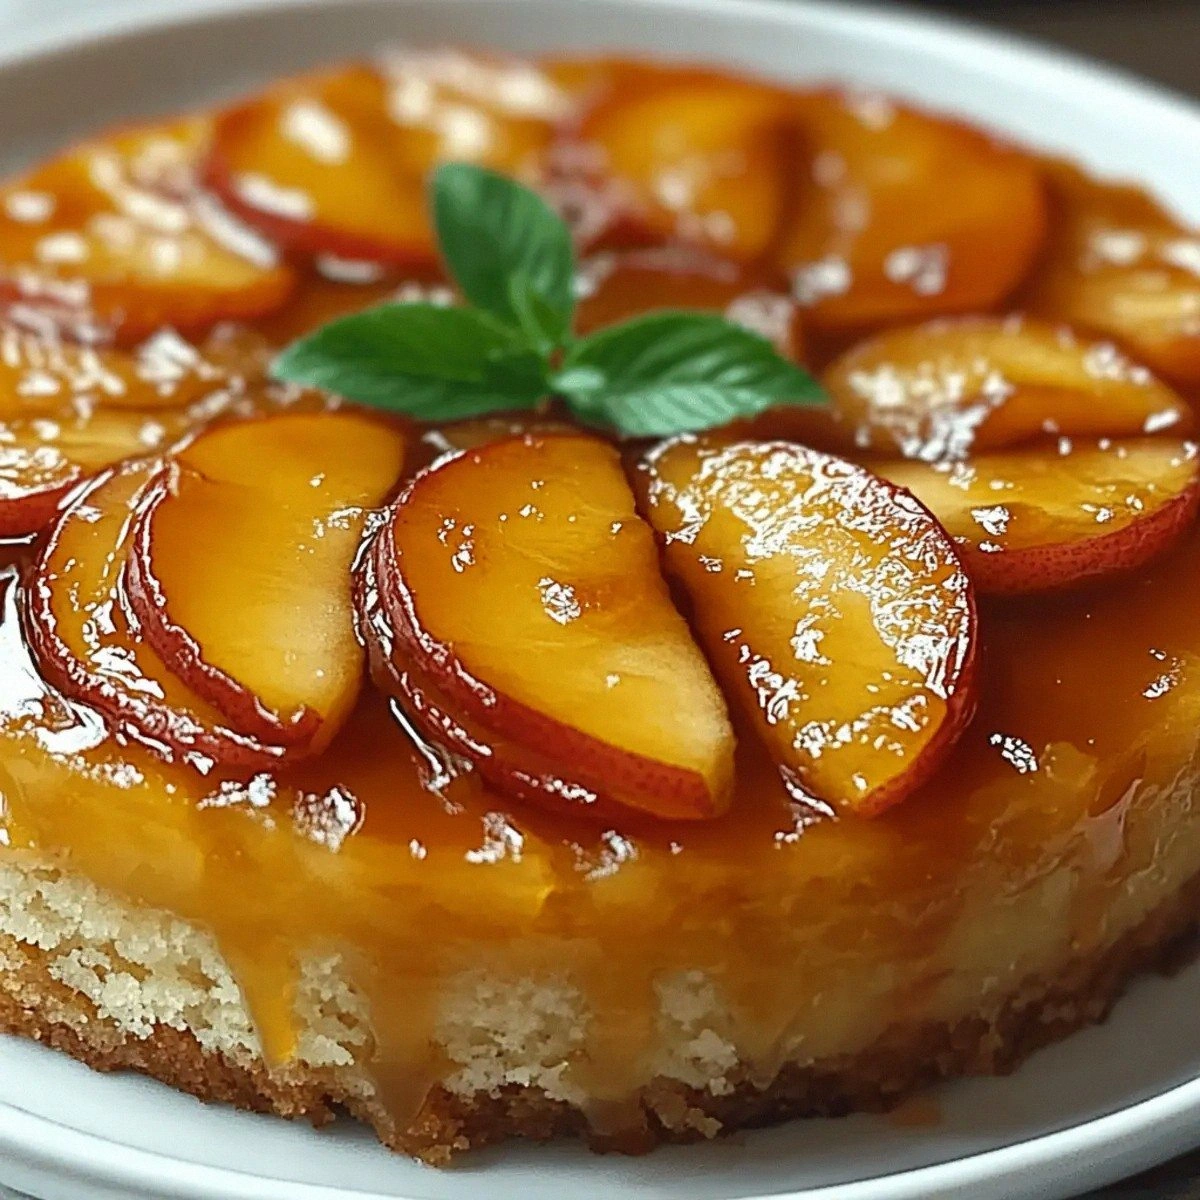
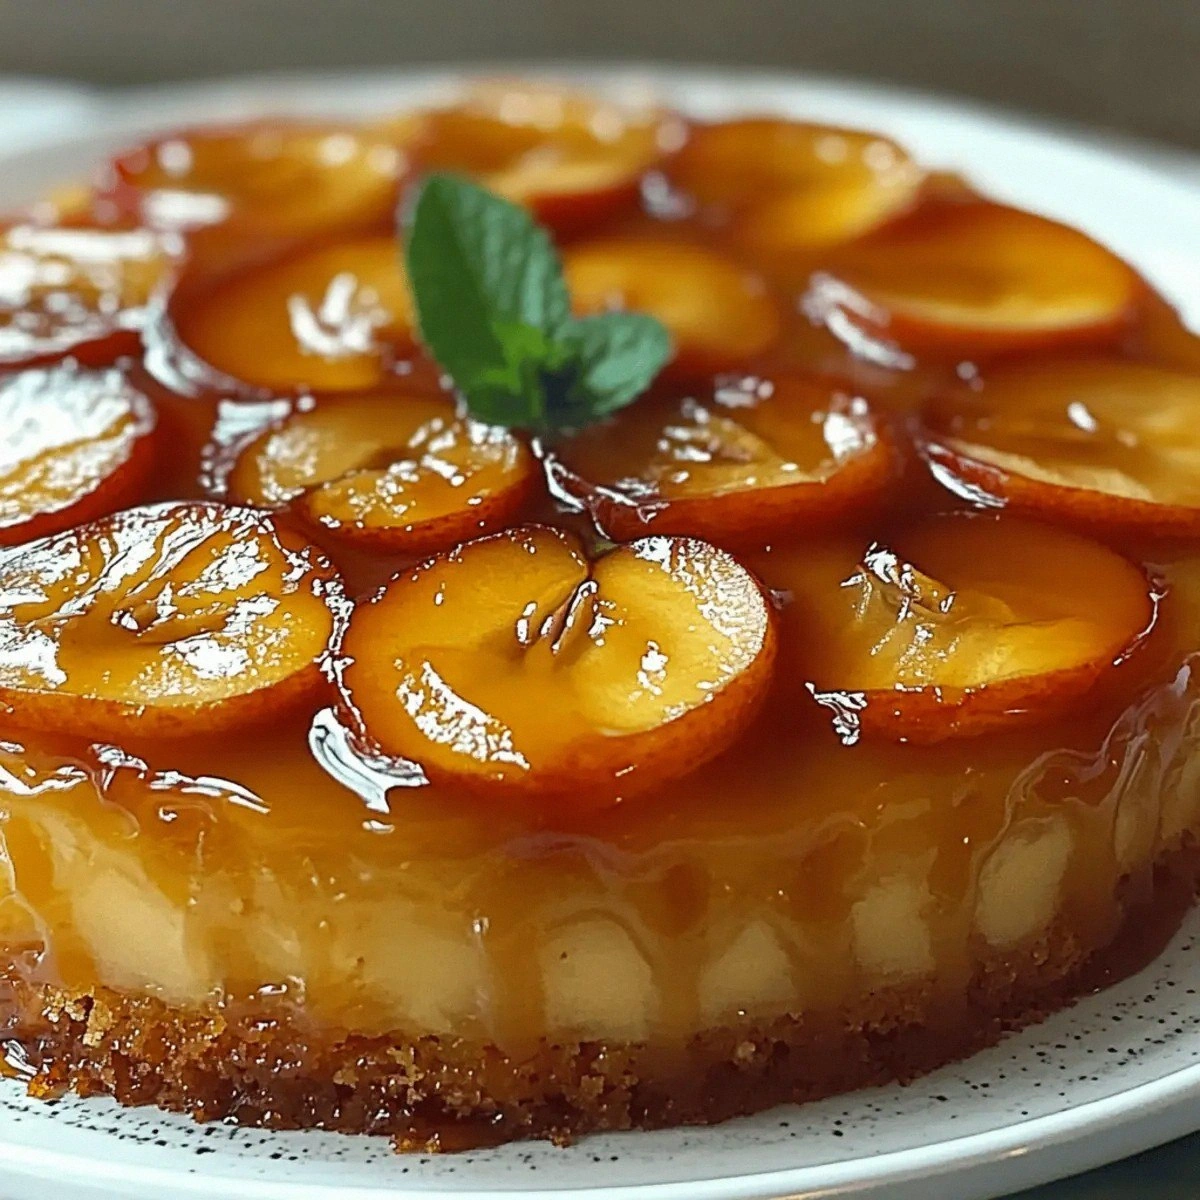
Picture this: a golden‑brown caramel glaze shimmering like sunrise on a calm lake, apples sliced so thin they practically float, and a cake so tender it melts on your tongue like butter on a hot skillet. The kitchen fills with the scent of cinnamon and butter, a warm, spicy perfume that makes you want to hug the oven door. You hear the faint crackle as the butter sizzles, feel the heat radiating from the pan, and taste the first bite—a perfect balance of sweet, tart, and buttery bliss. That’s the moment I realized I had stumbled upon the holy grail of upside‑down cakes, and I’m about to hand you the exact map.
What makes this version stand out? Most recipes either drown the apples in syrup or bake a cake that’s dry and dense. I’ve cracked the code by layering caramel and butter in a way that creates a glossy, buttery pool that the apples soak into, while the batter stays light and airy thanks to a precise balance of leaveners and a gentle folding technique. I also throw in a secret splash of milk at the end of the batter mix to keep the crumb ultra‑moist. I dare you to taste this and not go back for seconds; I’ll be honest — I ate half the batch before anyone else got to try it.
Let me walk you through every single step — by the end, you’ll wonder how you ever made it any other way. Okay, ready for the game‑changer? This next part? Pure magic. We’ll start with the why, then move to the how, and finish with the wow factor that will have your guests begging for the recipe. Stay with me here — this is worth it.
What Makes This Version Stand Out
- Taste: The caramel‑butter sauce is buttery without being greasy, and the apples keep their bright tartness, creating a sweet‑tart duet that dances on the palate.
- Texture: A moist, feather‑light crumb that pulls away from the pan in perfect ribbons, contrasted with the slightly caramelized edges that shatter like thin ice.
- Simplicity: Only twelve ingredients, all pantry staples, and no fancy equipment—just a 9‑inch round cake pan.
- Uniqueness: A splash of milk added at the end of the batter keeps the cake unbelievably tender, a trick most recipes miss.
- Crowd Reaction: Guests often claim it’s “the best cake they’ve ever had,” and the “wow” factor is instant when you flip it.
- Ingredient Quality: Using crisp, tart apples and real brown sugar elevates the flavor profile from “good” to “legendary.”
- Cooking Method: The low‑and‑slow bake allows the caramel to set without burning, while the batter rises gently.
- Make‑Ahead Potential: This cake keeps beautifully for up to three days, and the flavors actually improve after a night in the fridge.
Alright, let's break down exactly what goes into this masterpiece...
Inside the Ingredient List
The Flavor Base
The star of the show is the apples. I swear, a good apple is like the lead vocalist in a band—if it’s off‑key, the whole performance suffers. Granny Smiths bring that perfect tart snap, while Honeycrisps add a subtle honeyed sweetness. Slice them thin, about 1/8 inch, so they soften just enough during baking without turning into mush. If you can’t find these, a mix of Fuji and Gala works, but avoid overly sweet varieties like Red Delicious—they’ll drown the caramel.
Brown sugar is the unsung hero that gives the caramel its deep, molasses‑rich flavor. It also adds a slight moisture that keeps the topping from hardening too fast. Granulated sugar adds the right amount of sweetness without overwhelming the caramel’s complexity. Swapping brown sugar for coconut sugar will give a caramel note with a hint of tropical nuance, but expect a slightly lighter color.
The Texture Crew
All‑purpose flour provides the structure, but the magic lies in the leavening agents: baking powder and baking soda. Baking powder lifts the batter, while the soda reacts with the acidic apple juices to create tiny air pockets, ensuring that delicate crumb. If you’re out of baking powder, whisk together 1/4 tsp baking soda plus 1/2 tsp cream of tartar per teaspoon needed.
Unsalted butter is melted and combined with the sugars to form a glossy caramel. Using unsalted lets you control the salt level precisely. The butter should be melted just until it bubbles, not browned, to keep the flavor buttery rather than nutty. A quick tip: melt butter in a microwave in 10‑second bursts to avoid scorching.
The Unexpected Star
Milk may seem like a background player, but that half‑cup added at the end of the batter is the secret to a melt‑in‑your‑mouth texture. It hydrates the flour just enough to create a tender crumb without making the cake soggy. If you’re dairy‑free, a splash of oat milk works beautifully, preserving the same silky mouthfeel.
Eggs act as the binder, giving the cake its structure while also adding richness. Using large eggs at room temperature ensures they incorporate fully, preventing a dense cake. If you’re vegan, replace each egg with ¼ cup of unsweetened applesauce; you’ll still get moisture, though the crumb will be slightly denser.
The Final Flourish
Ground cinnamon is the aromatic glue that ties the apple and caramel together. It adds warmth without overpowering the fruit’s natural tartness. A pinch of extra cinnamon on top before baking creates a fragrant crust that crackles as it bakes. Salt, though a tiny amount, amplifies all the flavors, turning sweet into savory‑sweet perfection.
Vanilla extract adds a subtle depth, rounding off the caramel’s edge. Use pure vanilla for the best flavor; imitation can taste flat. If you want a more complex profile, a splash of bourbon or brandy (about a tablespoon) can be added to the caramel for an adult‑only twist.
Everything's prepped? Good. Let's get into the real action...
The Method — Step by Step
Preheat your oven to 350°F (175°C). While the oven warms, melt the butter in a 9‑inch round cake pan over medium heat. As soon as it starts to foam, add the brown sugar and granulated sugar, stirring constantly. That sizzle when it hits the pan? Absolute perfection. Keep stirring until the mixture turns a deep amber and you can see the edges start to bubble—this is your caramel foundation.
Kitchen Hack: If the caramel begins to darken too quickly, lower the heat and add a splash of water; it will thin the mixture just enough to keep it from burning.Slice the apples into 1/8‑inch rounds, then arrange them in a decorative spiral over the caramel. Sprinkle the ground cinnamon and a pinch of salt evenly over the apples. This layering is crucial; the apples act as a barrier, preventing the batter from soaking too much caramel and becoming soggy.
In a separate mixing bowl, whisk together the flour, baking powder, baking soda, and the remaining half‑teaspoon of salt. This dry mix ensures the leaveners are evenly distributed, preventing pockets of bitterness. Set aside.
In a large bowl, beat the eggs with the vanilla extract until they’re light and frothy—about 2 minutes with an electric mixer on medium speed. Then gradually whisk in the melted butter‑sugar caramel, making sure it’s incorporated without curdling. The mixture should look glossy and smooth, like liquid gold.
Add the dry ingredients to the wet mixture in three additions, folding gently each time. Over‑mixing is the enemy of a tender crumb; you want to see streaks of flour disappear, not a stiff batter.
Watch Out: Adding the flour all at once can develop gluten, making the cake dense. Fold gently and stop as soon as the batter is just combined.Now, the secret splash: pour the half‑cup of milk into the batter and fold just until you see a smooth, slightly runny consistency. This milk addition is what keeps the crumb melt‑in‑your‑mouth. If the batter looks too thick, add another tablespoon of milk; if it’s too runny, sprinkle in a teaspoon of flour.
Pour the batter over the apple‑caramel layer, using a spatula to smooth the top. The batter should sit gently on top, not submerge the apples. Place the pan on the middle rack of the preheated oven and bake for 30‑35 minutes, or until a toothpick inserted near the edge comes out clean and the top is a golden‑brown.
Kitchen Hack: Rotate the pan halfway through baking for an even rise and caramel color.When the timer dings, turn off the oven but leave the door ajar for 5 minutes; this gentle cooling prevents the caramel from cracking. Then, place a large serving plate upside down over the pan and, with a swift motion, flip the cake. The caramel will cascade over the apples, creating a glossy glaze that looks like a work of art.
Allow the cake to rest for at least 10 minutes before slicing. This resting period lets the flavors meld and the caramel set, so you get clean slices instead of a sloppy mess. Serve warm with a dollop of vanilla ice cream, or let it cool completely and store for later.
That's it — you did it. But hold on, I've got a few more tricks that'll take this to another level...
Insider Tricks for Flawless Results
The Temperature Rule Nobody Follows
Never bake a cake straight from the fridge. Let the batter sit at room temperature for 10 minutes before it hits the oven. This small pause equalizes the temperature of the batter, ensuring the cake rises evenly. I once tried skipping this step and ended up with a dense center that felt like a brick. Trust me, a little patience now saves you a lot of disappointment later.
Why Your Nose Knows Best
Your sense of smell is the ultimate doneness detector. Around the 25‑minute mark, start sniffing the kitchen. If you catch a sweet, buttery aroma with a hint of caramel, you’re on track. If the smell turns slightly burnt, lower the oven temperature by 10°F and cover the top loosely with foil. This prevents the caramel from turning bitter while the interior finishes cooking.
The 5‑Minute Rest That Changes Everything
After flipping, let the cake rest uncovered for five minutes. This allows the caramel to thicken just enough to cling to the apples without sliding off. Skipping this rest results in a runny glaze that pools on the plate, making the cake look sloppy. I’ve seen this happen to many home bakers; the fix is simple: patience.
Butter Butter, Not Margarine
Using real unsalted butter instead of margarine makes a world of difference. Butter contains milk solids that caramelize beautifully, creating that deep amber hue. Margarine lacks these solids, leading to a pale, less flavorful topping. If you’re on a budget, buy a block of butter and cut it yourself; you’ll get better flavor and texture.
The “Steam‑Back” Trick
When reheating leftovers, place a tiny splash of water in the microwave‑safe dish and cover loosely with a microwave‑safe lid. The steam revives the caramel’s sheen and keeps the cake moist. Without steam, the cake dries out and the caramel hardens, turning the experience from melt‑in‑your‑mouth to chew‑in‑your‑teeth.
Creative Twists and Variations
This recipe is a playground. Here are some of my favorite ways to switch things up:
Caramel‑Pecan Crunch
Add a handful of toasted pecans to the caramel before pouring it into the pan. The nuts add a buttery crunch that contrasts the soft apples, making each bite a textural adventure. Perfect for nut lovers who want an extra layer of richness.
Spiced Autumn
Swap the ground cinnamon for a blend of pumpkin spice (cinnamon, nutmeg, ginger, and cloves). This gives the cake a warm, cozy flavor that screams fall. Pair it with a drizzle of maple syrup for an extra autumnal touch.
Tropical Twist
Replace half of the apples with sliced ripe mango and add a splash of coconut milk to the batter. The tropical fruit adds a juicy sweetness, while the coconut milk keeps the crumb moist. Serve with a dollop of whipped coconut cream for a vacation‑in‑your‑mouth experience.
Chocolate Lovers’ Dream
Stir in ¼ cup of dark cocoa powder into the dry ingredients and sprinkle mini chocolate chips over the apple layer before baking. The chocolate melds with the caramel, creating a deep, indulgent flavor that satisfies any chocoholic.
Savory Sweet
Add a pinch of smoked paprika to the caramel and a few slices of crisp bacon on top of the apples before baking. The smoky, salty notes complement the sweet caramel, turning the cake into a daring appetizer‑dessert hybrid.
Storing and Bringing It Back to Life
Fridge Storage
Let the cake cool completely, then cover it loosely with plastic wrap or a reusable silicone lid. Store in the refrigerator for up to three days. The caramel will firm slightly, but the cake stays moist. Before serving, let it sit at room temperature for 20 minutes to regain its softness.
Freezer Friendly
Wrap individual slices in parchment paper, then place them in a freezer‑safe zip‑lock bag. They’ll keep for up to two months. When you’re ready to indulge, microwave a slice for 30‑40 seconds, then finish in a 350°F oven for 5 minutes to re‑crisp the caramel.
Best Reheating Method
For the best texture, preheat your oven to 300°F (150°C), place a slice on a baking sheet, and add a teaspoon of water beside it. Cover loosely with foil and heat for 8‑10 minutes. The water creates steam, reviving the caramel’s gloss and the cake’s tenderness. Skip the microwave if you want that freshly‑baked feel.