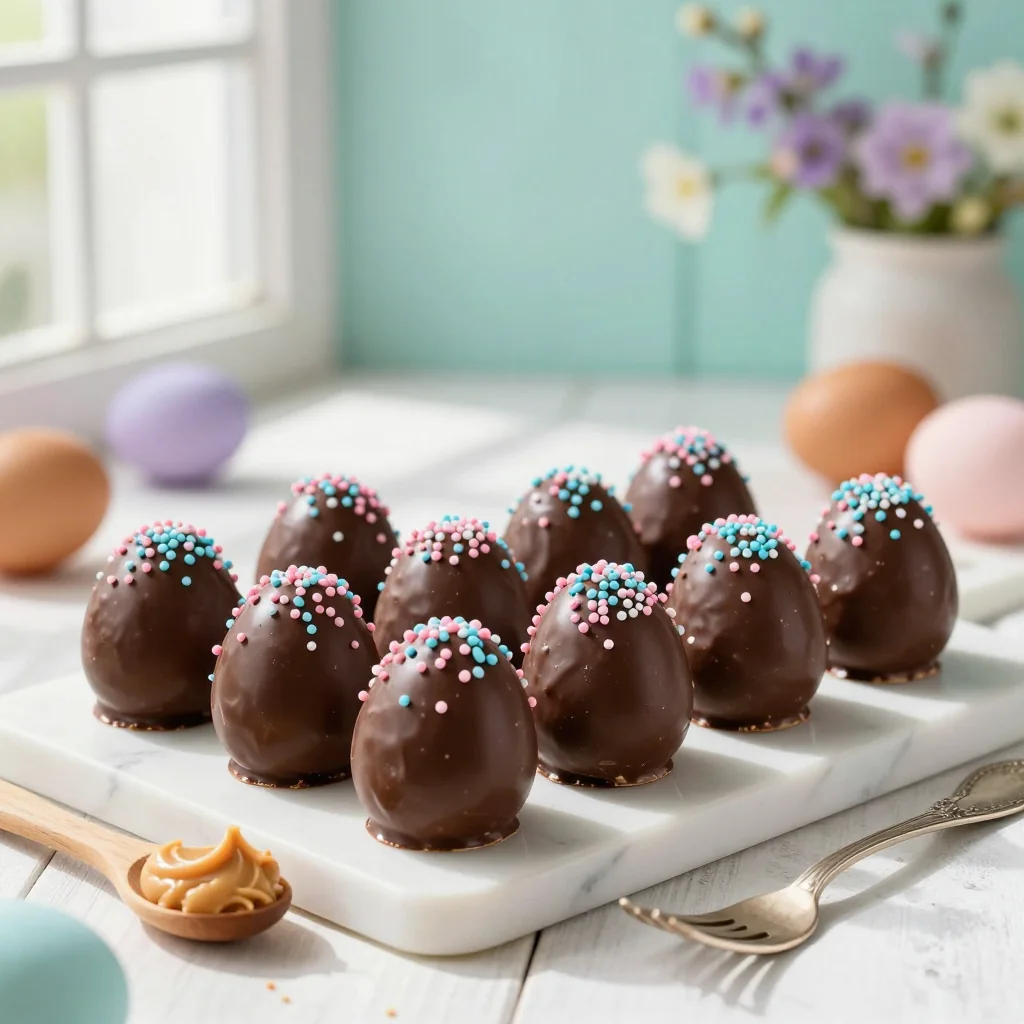
A playful, protein‑packed Easter treat that looks like a classic egg but bursts with creamy peanut butter inside.

There’s something magical about Easter mornings—the soft pastel colors, the rustle of fresh grass, and the thrill of hunting for hidden treasures. I still remember the first time I stumbled upon a tray of chocolate‑covered peanut butter eggs at my sister’s kitchen; the glossy dark shell glistened like a tiny treasure chest, and the moment I cracked it open, a silky peanut butter center melted on my tongue. That memory sparked a culinary adventure that blended the nostalgic comfort of peanut butter with the luxurious sheen of chocolate.
This recipe draws inspiration from traditional Easter confections while adding a wholesome twist that makes it perfect for a hearty breakfast or a festive brunch. Peanut butter offers protein and a comforting earthiness, while the dark chocolate coating provides a bittersweet contrast that elevates the overall flavor profile. The result is a bite‑size indulgence that feels both familiar and exciting.
In the following pages, I’ll walk you through every step—from selecting the best natural peanut butter to tempering chocolate for that perfect snap. You’ll learn why each ingredient matters, how to scale the recipe for any crowd, and a handful of pro tips that will make your eggs look bakery‑level stunning.
Grab your mixing bowls, preheat your imagination, and let’s create a batch of Easter eggs that will become the highlight of your holiday table.
🌟 Why This Recipe Will Win Your Heart
Whether you’re a peanut butter aficionado or a chocolate lover, this dish delivers a harmonious blend of textures and flavors that keeps you coming back for more.
- ✨ Perfect Balance of Sweet and Salty: The creamy, slightly salty peanut butter filling is perfectly offset by the deep, slightly bitter chocolate coating, creating a sophisticated flavor dance.
- ✨ High‑Protein Breakfast Option: Each egg packs a generous amount of plant‑based protein, making it a satisfying start to the day without feeling heavy.
- ✨ Easy to Customize: Swap the dark chocolate for white or milk chocolate, add a pinch of sea salt, or drizzle with caramel for endless variations.
- ✨ Fun for All Ages: Kids love the novelty of “egg‑shaped” treats, while adults appreciate the refined taste and the nostalgic Easter vibe.
- ✨ Minimal Equipment Required: All you need are basic kitchen tools—mixing bowls, a spoon, and a microwave or stovetop for melting chocolate.
- ✨ Makes a Stunning Presentation: The glossy coating and optional gold dust turn these simple bites into eye‑catching centerpieces for any brunch spread.
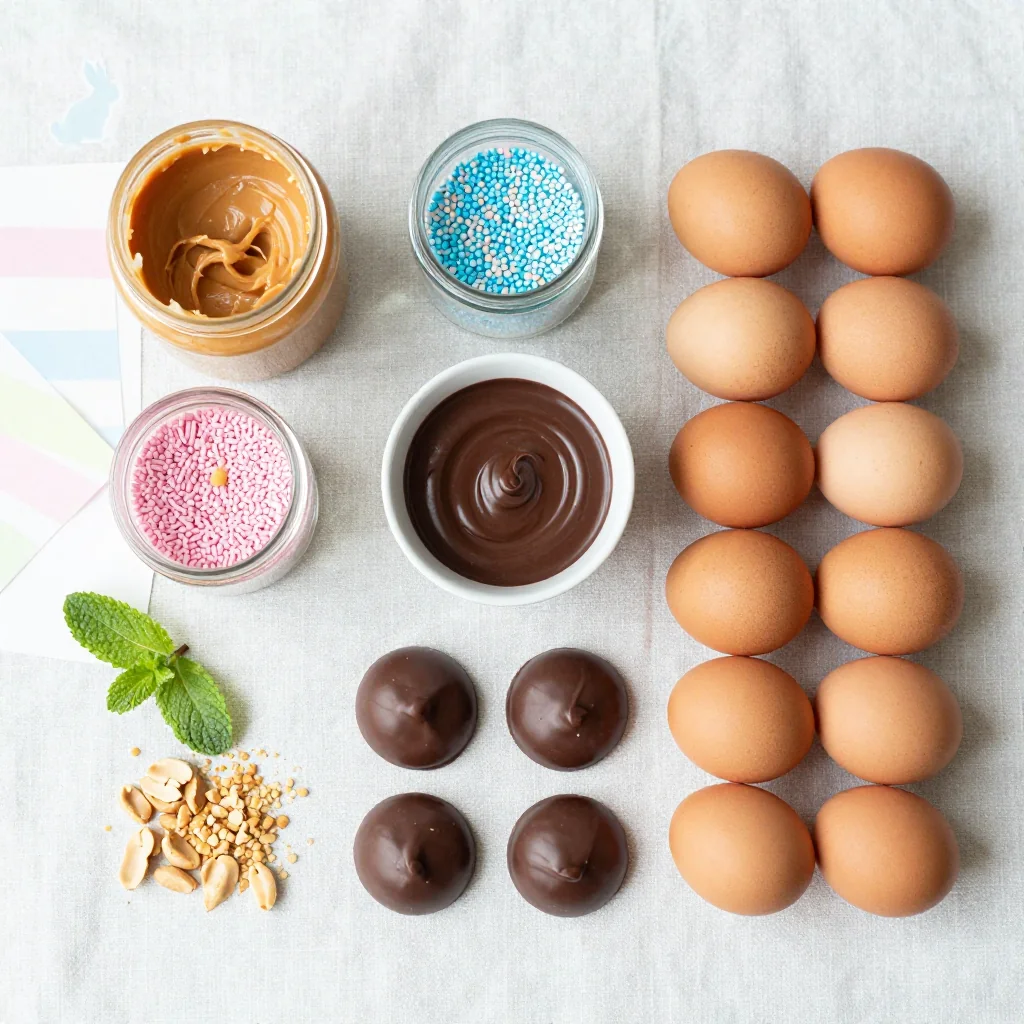
🥗 Ingredients
📝 Complete Ingredient List
For Peanut Butter Filling:
For Chocolate Coating:
For Decoration:
🔍 Focus on Key Ingredients
Creamy Peanut Butter
Peanut butter is the heart of this recipe, providing a rich, nutty base that stays stable even when warmed. Look for a product that lists peanuts as the sole ingredient; this ensures a pure flavor and a smooth texture that blends effortlessly with honey and sugar.
Dark Chocolate (70% Cocoa)
The chocolate coating must be firm enough to hold its shape but meltable for a glossy finish. Dark chocolate with a high cocoa percentage delivers a subtle bitterness that balances the sweetness of the filling, while also offering antioxidants and a lower sugar content compared to milk chocolate.
Coconut Oil
Coconut oil acts as a tempering agent, lowering the melting point of the chocolate so it spreads easily and sets with a beautiful sheen. Its subtle coconut aroma adds a faint tropical note without overwhelming the primary flavors.
🔄 Quick Substitutions
| If you don’t have... | Use instead... |
|---|---|
| Natural peanut butter | Almond butter |
| Honey | Maple syrup |
| Dark chocolate | Milk chocolate (for a sweeter version) |
👨🍳 Step‑by‑Step Instructions
Follow these clear phases to create perfectly shaped, chocolate‑coated peanut butter eggs that impress both the eye and the palate.
📋 Phase 1: Preparation & Mise en Place
Gather and measure all ingredients, then set up a clean workspace.
Measure and Combine Peanut Butter Filling Ingredients
In a medium bowl, add the 250 g of creamy peanut butter, 170 g honey, 30 g powdered sugar, 5 ml vanilla extract, and 2.5 g sea salt. Using a silicone spatula, stir until the mixture becomes glossy and homogeneous, about 2‑3 minutes. The mixture should be thick yet pliable enough to roll into balls.
Form the Peanut Butter Balls
Using a teaspoon, scoop out roughly 20 g of the filling and roll it between your palms to form smooth spheres. Place the balls on a parchment‑lined tray. You should obtain about 20‑22 balls, which will later be shaped into egg halves.
🔥 Phase 2: Chocolate Coating & Assembly
Melt the chocolate, dip the balls, and let them set.
Temper the Dark Chocolate
Place the 200 g dark chocolate and 30 ml coconut oil in a heat‑proof bowl. Melt using a double‑boiler method: simmer water in a saucepan, set the bowl on top, and stir until fully melted and smooth (approximately 4‑5 minutes). Remove from heat and let the temperature drop to about 31 °C (88 °F) for tempering.
Dip the Peanut Butter Balls
Using a fork or a small dipping tool, submerge each peanut butter ball into the tempered chocolate, ensuring an even coat. Gently tap the fork against the side of the bowl to let excess chocolate drip off.
Shape the Eggs
While the chocolate is still fluid, quickly press two coated balls together, aligning them to form an egg shape. The chocolate will act as an adhesive; hold for a few seconds until they bond. If needed, add a tiny dab of extra chocolate at the seam.
✨ Phase 3: Finishing Touches & Serving
Allow the chocolate to set, then garnish and serve.
Chill to Set the Chocolate
Transfer the assembled eggs onto a wire rack and refrigerate for 20‑30 minutes, or until the chocolate is firm to the touch. This step ensures a clean snap when biting into the egg.
Garnish
Once set, sprinkle the crushed peanuts over the tops for added crunch. For a festive flourish, dust lightly with edible gold dust.
Serve
Arrange the eggs on a decorative platter. They pair beautifully with fresh berries, a dollop of Greek yogurt, or a glass of cold orange juice. Enjoy immediately, or store as directed below.
💡 Expert Tips & Tricks
🛒 Choosing the Right Ingredients
Opt for a peanut butter that lists only peanuts and perhaps a pinch of salt—no added sugars or hydrogenated oils. This keeps the flavor pure and the texture smooth. When selecting chocolate, aim for a bar that contains at least 70% cocoa solids; lower percentages can result in a softer shell that may melt too quickly at room temperature. Finally, use cold‑pressed coconut oil; its neutral taste won’t compete with the chocolate, and its high saturated fat content helps the coating set firmly.
🔪 Preparation Techniques
Before forming the balls, chill the peanut butter mixture for 10‑15 minutes; this makes it easier to roll without sticking to your hands. Use a small cookie scoop for uniform sizing, which ensures even coating and consistent portion sizes. When dipping, work in small batches to keep the chocolate at a stable temperature.
🌡️ Mastering the Chocolate
Temper the chocolate by bringing it to 45 °C (113 °F), then cooling it to 31 °C (88 °F) before reheating slightly to 32 °C (90 °F). This process aligns the cocoa butter crystals, giving the coating a glossy finish and a firm snap. If you lack a thermometer, the “cold plate” test works: dip a spoon; if the chocolate solidifies within a few seconds, it’s ready.
🍽️ Presentation & Service
Place the eggs on a white or pastel-colored plate to make the dark chocolate pop. Add a sprinkle of edible gold dust for a luxurious Easter feel. Serve them at room temperature for optimal texture; if they’ve been refrigerated, let them sit for 5‑10 minutes before plating to avoid a cold bite.
🏆 Pro Tips
Elevate your egg‑making from good to restaurant‑grade with these insider tricks.
- 🎯 Use a Silicone Egg Mold: A silicone mold designed for chocolate eggs guarantees uniform shape and thickness, reducing the chance of cracks during handling.
- 🎯 Add a Pinch of Sea Salt to the Chocolate: A tiny amount (about 0.2 g) intensifies the chocolate’s flavor and balances the sweetness of the peanut butter.
- 🎯 Freeze the Peanut Butter Balls Briefly: A 5‑minute freeze makes them firmer, allowing for cleaner seams when joining two halves.
- 🎯 Use a Thermometer for Precise Tempering: Consistency in temperature prevents bloom (white streaks) and ensures a glossy finish.
- 🎯 Finish with a Light Brush of Shimmer Oil: Brushing a thin layer of neutral oil after the chocolate sets adds a subtle sheen without affecting taste.
- 🎯 Store in a Single Layer: Stack eggs only if separated by parchment paper; stacking can cause the chocolate to stick together.
“Chocolate is an edible form of joy; when paired with a nutty center, it becomes an instant celebration in every bite.” — Chef Pierre Dupont
🔄 Variations & Adaptations
This recipe is a versatile canvas; feel free to experiment with flavors, textures, and dietary needs.
🥬 Vegetarian/Vegan Version
Swap the honey for maple syrup or agave nectar to keep the recipe fully vegan. Use a plant‑based chocolate that contains no dairy, and ensure the peanut butter is free from added animal‑derived ingredients.
- Maple syrup (instead of honey) – adds a caramel‑like nuance.
- Vegan dark chocolate – check the label for dairy‑free certification.
🌶️ Flavor Variations
Play with global flavor profiles to match your palate or theme.
Spicy Version:
Add ½ teaspoon of cayenne pepper to the peanut butter mixture and a pinch of smoked paprika to the chocolate for a subtle heat that awakens the senses.
Mediterranean Version:
Incorporate finely chopped pistachios into the coating and finish with a drizzle of honey infused with orange blossom water.
Asian Inspired Version:
Replace the dark chocolate with white chocolate, add a splash of soy sauce to the filling, and sprinkle toasted sesame seeds on top for a sweet‑savory twist.
⚠️ Dietary Adaptations
Gluten‑Free:
All ingredients are naturally gluten‑free; just ensure the chocolate and peanut butter are processed in a gluten‑free facility.
Lactose‑Free:
Use dairy‑free dark chocolate and omit any butter‑based toppings. Coconut oil already provides a dairy‑free fat source.
Low‑Calorie:
Reduce honey to 100 g and replace half of the chocolate with cocoa powder mixed with a touch of coconut oil to lower overall calories while preserving flavor.
👶 Family/Children Version
For younger palates, use milk chocolate instead of dark, and replace crushed peanuts with finely ground toasted oats for a softer texture. You can also drizzle with a thin layer of white chocolate for added sweetness.
📦 Storage & Reheating
🧊 Conservation
In the Refrigerator:
- Duration: 5 days
- Recommended container: Airtight glass or BPA‑free plastic box
- Tip: Place a sheet of parchment paper between layers to prevent sticking.
In the Freezer:
- Duration: 2 months
- Method: Freeze on a parchment‑lined tray, then transfer to a zip‑lock bag.
- Defrosting: Move to the refrigerator overnight, then let sit at room temperature 10 minutes before serving.
💡 For best texture, avoid repeated temperature changes; they can cause the chocolate to develop a white bloom.
♨️ Reheating
🔥 Oven (Recommended):
- Preheat to 150 °C (300 °F).
- Place eggs on a parchment‑lined baking sheet.
- Heat for 5‑7 minutes until the chocolate softens slightly.
- Remove and let cool for 2 minutes before serving.
⚡ Microwave (Quick):
- Cover with a microwave‑safe lid.
- Heat on medium power for 20‑30 seconds.
- Check and stir gently; repeat in 10‑second bursts if needed.
🍳 Skillet:
Heat a non‑stick skillet over low heat, place the egg seam‑side down for 30 seconds to melt the chocolate slightly, then flip briefly.
🍷 Perfect Pairings
🥗 Side Dishes
- Fresh Berry Salad: A mix of strawberries, blueberries, and mint adds acidity and bright color.
- Greek Yogurt with Honey Drizzle: Creamy yogurt balances the richness of the chocolate.
- Light Citrus Quinoa: A fluffy quinoa tossed with orange zest offers a subtle savory contrast.
🍷 Wine & Beverage Pairings
- Dry Riesling: Its crisp acidity cuts through the chocolate’s richness.
- Light Amber Ale: The malt sweetness complements the peanut butter.
- Non‑Alcoholic Option: Sparkling water with a splash of fresh orange juice.
🍰 Complementary Courses
Start with a citrusy avocado toast or a light vegetable frittata, then serve the peanut butter eggs as the star dessert, followed by a simple lemon sorbet to cleanse the palate.
❓ Frequently Asked Questions
Q: Can I use crunchy peanut butter instead of creamy?
A: Yes, but the texture will be grainier. For a smoother filling, blend the crunchy variety in a food processor until it reaches a creamy consistency.
Q: How do I prevent the chocolate from blooming?
A: Proper tempering is key. Keep the chocolate within the 31‑32 °C range after melting, store the eggs in a cool, dry place, and avoid sudden temperature changes.
Q: What if I don’t have a thermometer?
A: Use the “cold plate” method: dip a metal spoon into the melted chocolate and place it on a cool metal surface. If it hardens within a few seconds, the temperature is correct.
Q: Can I make these eggs ahead of time?
A: Absolutely. Prepare and chill them up to two days in advance. Keep them sealed in an airtight container to maintain freshness.
Q: Are there any nut‑free alternatives?
A: Replace peanut butter with sunflower seed butter or almond butter (if nuts are acceptable). For a completely nut‑free version, use soy butter.
Q: How can I make the eggs less sweet?
A: Reduce the honey to 100 g and increase the pinch of sea salt. You can also use a higher cocoa percentage chocolate (80‑85%) for a more bitter profile.
🎉 Let’s Get Cooking!
This Peanut Butter Egg recipe combines the nostalgic charm of Easter with a protein‑rich, indulgent twist that makes it suitable for breakfast, brunch, or a festive snack. The simple steps, adaptable ingredients, and eye‑catching presentation ensure that even novice cooks can achieve impressive results. Remember, the secret lies in quality ingredients, proper tempering, and a little patience while the chocolate sets.
Give it a try, share your photos, and let us know how you personalized the flavors. Your feedback helps the community grow, and every comment adds a new layer of inspiration for future creations.
Have you tried this recipe?
Leave a comment and rating below! Share your photos on Instagram with #PeanutButterEggsEaster for a chance to be featured.
Peanut Butter Eggs with Chocolate Coating for Easter
Chocolate‑kissed peanut butter eggs that turn any breakfast into a celebration.
📝 Ingredients
Peanut Butter Filling
Chocolate Coating
Decoration
👨🍳 Instructions
- 1 Measure and combine all filling ingredients; stir until smooth.
- 2 Form the mixture into 20‑22 smooth balls and chill for 10 minutes.
- 3 Melt chocolate and coconut oil together, temper to 31 °C.
- 4 Dip each ball into chocolate, letting excess drip off.
- 5 Join two coated balls to create an egg shape; seal the seam with a dab of chocolate.
- 6 Refrigerate the assembled eggs for 20‑30 minutes until set.
- 7 Sprinkle crushed peanuts and optional gold dust over the tops.
- 8 Serve on a platter with fresh berries or yogurt.
- 9 Store leftovers in an airtight container in the fridge for up to 5 days.
- 10 Reheat gently in a 150 °C oven before serving if desired.
🥗 Nutritional Information (per serving)
*Values are estimates based on standard ingredient data.
📚 You Might Also Like
Chocolate Banana Bread
Almond Butter Cupcakes
Raspberry Mousse


💬 Comments & Reviews
Leave a Comment
No comments yet – be the first to share your thoughts!