The kitchen was a battlefield that night, a chaotic swirl of sizzling pans, a rogue chipotle pepper that exploded in my hand, and a plate of plain tortilla chips that looked like a sad, unadorned desert. I stared at the empty bowl, feeling the familiar pang of “I need something epic.” That moment was the spark that lit the idea for the Seven‑Layer Taco Dip. I was craving layers of flavor that could be devoured in one bite, a dip that would transform a simple snack into an unforgettable experience.
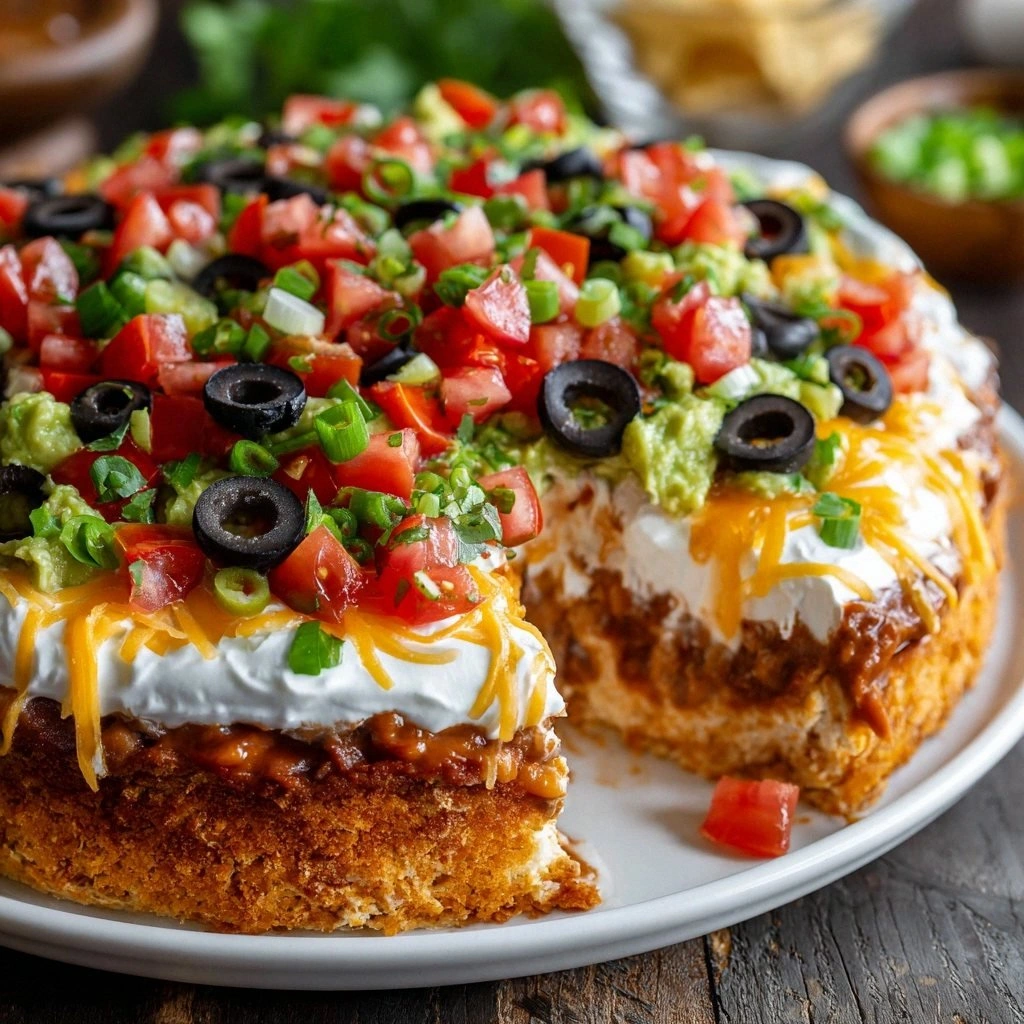
I imagined the first layer of creamy refried beans, smooth as a lullaby, spreading across the base. The second layer of guacamole would introduce a buttery, green velvet that would make your mouth water. The third layer—sour cream—would add a tangy, cool counterpoint that balances the richness. Then the salsa would burst with bright, zesty citrus notes that dance on the tongue. Cheddar cheese would melt into golden, gooey ribbons, while diced tomatoes would add a juicy pop. Black olives would sneak in briny whispers, and finally, green onions would finish with a fresh, sharp bite. Every layer is a chapter, every bite a story.
Most taco dips are a muddle of ingredients that end up competing for attention. Mine, however, is a carefully orchestrated symphony. I’ve discovered that layering in the correct order—beans first, then guacamole, followed by sour cream—creates a textural contrast that keeps the dip from becoming a mushy mess. The key is to let each layer set slightly before adding the next, allowing the flavors to mingle without drowning each other. This is hands down the best version you'll ever make at home because the result is a dip that is both visually stunning and palate‑pleasing.
I dare you to taste this and not go back for seconds. That’s the power of the layered approach: each bite is a revelation. The dip is not just a dip; it’s an edible masterpiece that will have your guests asking for the recipe while you’re still plating the last layer. Picture yourself pulling this out of the oven, the whole kitchen smelling incredible, the lights dimmed, and the chips lined up like a gallery of anticipation. Let me walk you through every single step — by the end, you'll wonder how you ever made it any other way.
What Makes This Version Stand Out
- Taste: The combination of creamy, tangy, and zesty layers creates a flavor profile that is both familiar and surprising. Each bite delivers a new experience without overwhelming the palate.
- Texture: The contrast between smooth beans, chunky guac, and crunchy olives ensures that every mouthful is engaging and satisfying.
- Visual Appeal: Seven distinct layers paint a rainbow of colors that make the dip a showstopper at any gathering.
- Ease of Assembly: No special tools or advanced techniques are required—just patience and a steady hand.
- Make‑Ahead Friendly: The dip can be prepared a day in advance and kept chilled, allowing the flavors to meld even further.
- Ingredient Quality: Using fresh, high‑quality components elevates the dish, turning an ordinary snack into a gourmet experience.
- Versatility: It can be served with tortilla chips, crackers, or even as a spread for tacos and burritos.
- Party‑Ready: The dip scales easily and is guaranteed to become the centerpiece of any gathering.
Alright, let's break down exactly what goes into this masterpiece…
Inside the Ingredient List
The Flavor Base
Refried beans are the backbone of the dip, providing a creamy, hearty texture that anchors the other layers. They are rich in protein and fiber, giving the dip a satisfying heft. If you skip this layer, the dip loses its depth and becomes a thin, watery spread. For a homemade touch, mash canned beans with a splash of lime juice and a pinch of cumin.
The Texture Crew
Guacamole adds a buttery, green velvet that contrasts beautifully with the beans. It introduces healthy fats and a subtle avocado flavor that smooths the dip's overall profile. If you opt out of guac, the dip will feel less luxurious and more like a standard salsa. A quick alternative is to blend avocado with a dash of mayo for a richer mouthfeel.
Sour cream is the next textural player, bringing a cool, tangy element that cuts through the richness of the beans and guac. It also creates a creamy layer that holds the salsa in place. Skipping sour cream can result in a dip that is too dense and lacks a refreshing lift. Greek yogurt is a great substitute for a lower‑fat version, maintaining the same tang.
The Unexpected Star
Salsa is the bright, zesty star that injects a burst of flavor into each bite. It keeps the dip from feeling heavy by adding moisture and a subtle heat. If you use a very hot salsa, the dip may become overpowering; choose a medium salsa for balanced heat. You can also experiment with pico de gallo for a fresher, chunkier texture.
The Final Flourish
Shredded cheddar cheese adds a savory, melty layer that melts into golden ribbons when baked. It offers a rich, umami flavor that complements the tangy and spicy notes below. If you prefer a sharper taste, substitute pepper jack for a hint of heat. Remember that cheese will brown, so keep an eye on it to avoid burning.
Diced tomatoes provide a juicy burst of freshness, preventing the dip from feeling too dense. They also add a subtle sweetness that balances the spice. Using canned tomatoes is a convenient option, but fresh tomatoes will give a brighter flavor, especially in summer.
Sliced black olives introduce a briny contrast that deepens the overall taste. If you’re not a fan of olives, simply omit them or replace them with pitted green olives for a milder flavor. Olives also add a pleasant crunch that breaks up the creamy layers.
Chopped green onions finish the dip with a fresh, oniony crunch. They add a bright, herbaceous note that lifts the entire dish. If you prefer a milder flavor, use chives instead. The green onion also offers a pop of color that enhances the dip’s visual appeal.
Everything's prepped? Good. Let's get into the real action…
The Method — Step by Step
-
Begin by spreading a generous layer of refried beans across the bottom of a 9‑inch baking dish. Use a spatula to create an even surface, ensuring that each chip will have a solid base. Let the beans sit at room temperature for a few minutes; this prevents the dip from becoming too cold and sticky when you add the next layer. The beans should feel cool but not chilled.
-
Next, spread a smooth layer of guacamole over the beans. The guac should be thick enough to hold its shape but not so thick that it overwhelms the beans. Use a spoon to create a slight swirl pattern for visual interest. Let the guac rest for about 5 minutes to allow the flavors to meld.
-
Now, spoon a layer of sour cream over the guac. The sour cream should be spread in a way that covers the guac entirely, creating a creamy blanket. This layer is crucial for preventing the salsa from seeping through too quickly. After spreading, gently press the sour cream into the guac to help them bond.
-
Add the salsa on top, using a ladle to pour it evenly. The salsa should be bright and slightly chunky, offering a burst of flavor with each bite. Ensure that the salsa doesn’t spill over the edges of the dish; you want a neat presentation. The salsa layer will act as a barrier between the creamy layers and the cheese.
-
Sprinkle shredded cheddar cheese over the salsa, letting it cascade into the crevices. The cheese should be distributed evenly, covering the entire surface. The cheese layer will melt into golden, gooey ribbons when baked, adding a satisfying texture. Let the cheese sit for a minute to settle into the layers.
-
Scatter diced tomatoes over the cheese. The tomatoes add a juicy pop and a touch of acidity that brightens the dip. Make sure each tomato slice is small enough to fit between the cheese ribbons. This layer should be visible but not dominate the overall structure.
-
Finish the dip by sprinkling sliced black olives and chopped green onions on top. The olives provide a briny contrast, while the onions add a fresh, sharp note. These final touches create a visual contrast of color and texture that makes the dip irresistible. The dip should now look like a rainbow of flavors.
-
Bake the dip in a preheated oven at 375°F (190°C) for 20 minutes, or until the cheese is melted and bubbling. The edges of the dip will begin to pull away slightly, indicating that the layers are perfectly cooked. Remove the dish and let it cool for 5 minutes before serving. The dip is now ready to be devoured.
That's it — you did it. But hold on, I've got a few more tricks that'll take this to another level…
Insider Tricks for Flawless Results
The Temperature Rule Nobody Follows
Baking the dip at exactly 375°F ensures the cheese melts without scorching. If the temperature is too high, the cheese will burn before the layers meld. I’ve found that a lower temperature of 350°F actually works better for a gentle melt, but it takes a few extra minutes. Keep a close eye on the cheese; the moment it turns golden and bubbly is the sweet spot.
Why Your Nose Knows Best
During baking, the aroma of melting cheese and simmering salsa is a cue that the dip is ready. Don’t rely solely on the timer; trust your senses. The dip should emit a savory, slightly sweet scent that makes your mouth water. If you’re still uncertain, lift the dish and check for a slight bubbling on the surface.
The 5‑Minute Rest That Changes Everything
After removing the dip from the oven, let it rest for 5 minutes. This brief pause allows the layers to set, making it easier to cut clean slices. It also lets the flavors meld further, creating a more cohesive taste. Skipping this rest can result in a runny dip that loses its structure.
Add a Splash of Water Before Reheating
If you’re reheating leftovers, add a tiny splash of water or broth before microwaving. This steams the dip back to perfection, preventing it from drying out. The moisture also helps the cheese melt evenly, restoring the dip’s original texture.
Serve with a Variety of Dippers
While tortilla chips are the classic choice, try serving the dip with pita chips, sliced baguette, or even fresh veggies like cucumber and bell pepper sticks. Each drier option offers a different crunch that complements the dip’s layers. Experimenting with dippers can keep the dish fresh for repeated gatherings.
Creative Twists and Variations
This recipe is a playground. Here are some of my favorite ways to switch things up:
Smoky Chipotle Dip
Add a teaspoon of chipotle powder to the salsa and a dash of smoked paprika to the beans. This gives the dip a deep, smoky undertone that pairs well with a crisp beer. The smoky flavor also balances the richness of the cheese and guac.
Vegan Version
Replace the sour cream with coconut yogurt and the cheese with a vegan shredded cheese blend. Use a plant‑based guacamole made from mashed avocado, lime, and cilantro. This version maintains the same layered structure while keeping it dairy‑free.
Breakfast Dip
Swap the salsa for a salsa verde and sprinkle crumbled bacon on top. Add a dash of maple syrup to the beans for a sweet twist. Serve with toasted English muffins or bagels for a hearty breakfast.
Mediterranean Twist
Replace the guacamole with a layer of hummus and use a Greek yogurt base instead of sour cream. Add feta cheese and chopped sun‑dried tomatoes for a Mediterranean flavor profile. This version is perfect for a summer potluck.
Spicy Kick
Use a hot salsa and add sliced jalapeños between the layers. Finish with a drizzle of hot honey for a sweet‑spicy finish. The jalapeños add a crisp heat that contrasts with the creamy layers.
Paleo-Friendly Dip
Omit the cheese entirely and replace it with a layer of crumbled pepper jack made from dairy‑free cheese. Use a homemade bean mix with coconut oil for extra flavor. This keeps the dish low‑carb while maintaining the layered concept.
Storing and Bringing It Back to Life
Fridge Storage
After baking, let the dip cool completely, then cover it with plastic wrap and store in the refrigerator for up to 3 days. The layers will firm up, making it easier to slice. When you’re ready to serve, let it sit at room temperature for 10 minutes to soften slightly.
Freezer Friendly
The dip freezes well in an airtight container for up to 2 weeks. Thaw overnight in the refrigerator, then reheat in a microwave for 2 minutes, stirring halfway through. The cheese may separate slightly, but a quick stir will restore its creamy texture.
Best Reheating Method
Reheat the dip in a low‑heat oven at 300°F (150°C) for 10–12 minutes, or until heated through. Add a splash of water or broth before reheating to keep the layers from drying out. The result is a dip that tastes almost as fresh as when it was first baked.