I was in a kitchen that smelled like burnt toast and melted butter, trying to salvage a dessert that had gone catastrophically wrong. A chocolate bar I’d been saving for a special treat had melted too fast, turning into a sticky puddle that clung to the countertop like a stubborn stain. I stared at the mess, feeling the frustration of a culinary disaster that could have ruined my evening. But then I remembered the old family recipe I’d found in a dusty cookbook, promising a fudge that was thick, glossy, and utterly irresistible. That memory sparked a dare in my mind: “I dare you to taste this and not go back for seconds.”
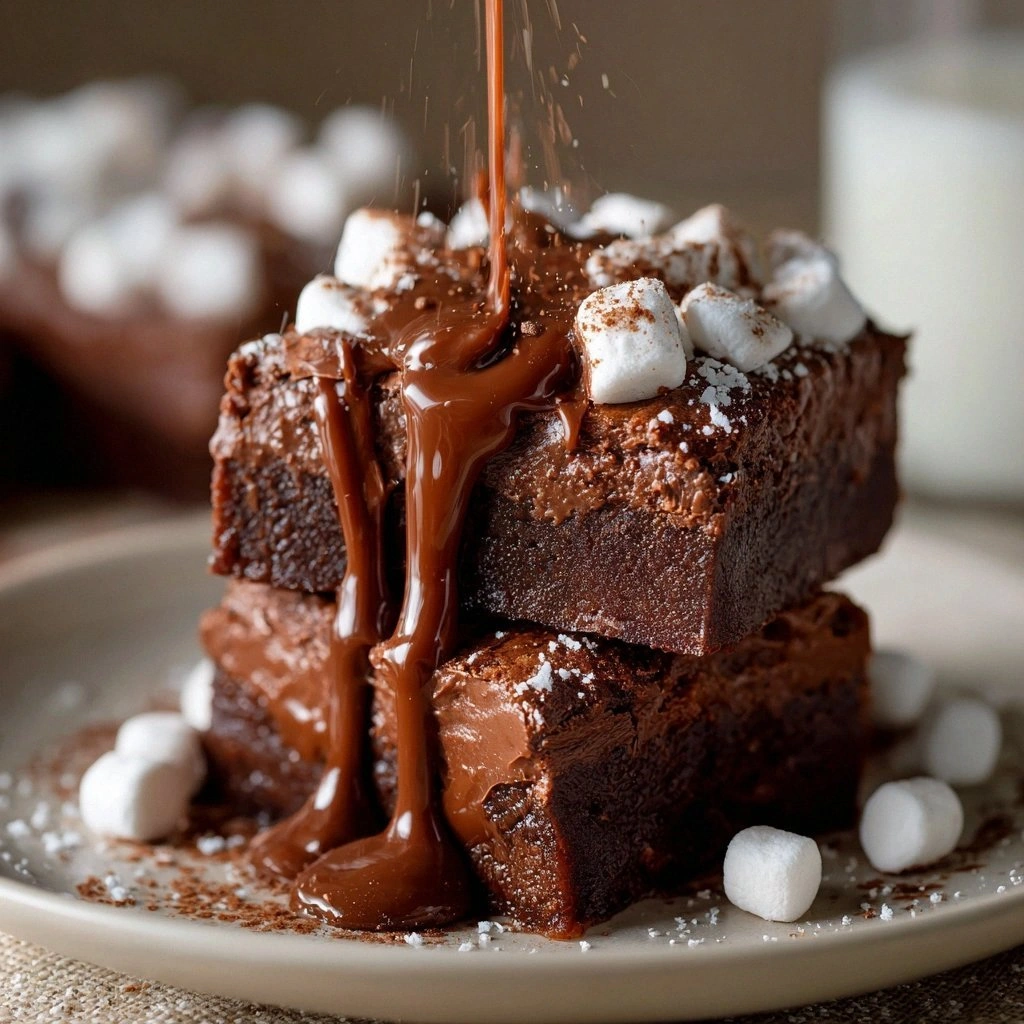
Picture yourself pulling this from the stove, the kitchen filling with a warm, chocolatey aroma that feels like a hug from a cocoa‑laden cloud. The sound of the mixture bubbling is a gentle, rhythmic hiss that signals the transformation from raw ingredients to silky delight. When you lift a spoonful, the fudge clings to the metal like a velvety coat, then breaks apart into a perfectly balanced bite that melts on the tongue. The texture feels like a chocolatey cloud that has been pressed into a dense, yet airy form, each bite releasing a burst of deep, bittersweet flavor. You’ll hear your own breath catch in awe, realizing that this is hands down the best version you’ll ever make at home.
Most recipes get this completely wrong, overcooking the fudge until it becomes chalky or undercooking it so it’s too runny to hold a shape. The secret here is a precise timing and a handful of small, often overlooked tweaks that elevate the flavor and texture. I’ll walk you through every single step, from selecting the right chocolate to the exact moment the fudge should be poured into the pan. By the end, you’ll wonder how you ever made it any other way, and you’ll have a recipe that feels like a secret weapon for any dessert table.
Let me walk you through every single step — by the end, you’ll wonder how you ever made it any other way.
What Makes This Version Stand Out
- Flavor Depth: The combination of high‑quality dark chocolate and a touch of sea salt creates a layered taste that dances between sweet and savory. The sea salt highlights the chocolate’s richness without overpowering it, giving the fudge a sophisticated finish.
- Texture Mastery: By cooking the mixture to the “soft ball” stage, the fudge attains a silky consistency that snaps back when you press it with a finger. This is the hallmark of professional chocolate fudge and ensures each bite is smooth, not grainy.
- Ingredient Simplicity: Only seven ingredients are needed, yet each one plays a critical role. You’ll never have to rummage through your pantry for obscure items.
- Make‑Ahead Potential: The fudge can be refrigerated for up to a week or frozen for months, making it a perfect batch‑cook dessert for busy weeks.
- Crowd Reaction: Friends and family will be stunned by how rich and luxurious the fudge feels, and they’ll ask for the recipe before you even finish the last bite.
- Ingredient Quality: Using a premium chocolate bar instead of chips unlocks a deeper flavor profile that makes the fudge feel artisanal.
- Cooking Method: The double boiler technique prevents scorching and ensures even heat distribution, a subtle yet vital technique that most home cooks overlook.
- Visual Appeal: The glossy finish and clean lines of the poured fudge look as good as they taste, making it perfect for photo‑ready dessert displays.
Alright, let’s break down exactly what goes into this masterpiece…
Inside the Ingredient List
The Flavor Base
Dark chocolate is the cornerstone of this fudge, providing the deep cocoa notes that define the flavor. Using a high‑percentage chocolate (70% or higher) ensures a robust taste that doesn’t feel overly sweet. If you skip the chocolate, the fudge loses its core character and becomes a plain milk‑based sweet. For a sweeter version, consider using a semi‑sweet chocolate bar, but be prepared for a less complex profile.
The Texture Crew
Whole milk adds creaminess and helps dissolve the sugar, creating a smooth batter that coats the chocolate. The butter contributes fat, which is essential for a glossy finish and a tender mouthfeel. A pinch of sea salt brightens the chocolate’s bitterness and balances the sweetness. Skipping the salt will leave the fudge tasting flat and overly sugary.
The Unexpected Star
Cocoa powder, though not the main flavor component, adds depth and a slightly bitter undertone that counters the sweetness of the sugar. It also helps thicken the mixture, giving the fudge a firmer set. If you don’t have cocoa powder on hand, you can replace it with an equal amount of unsweetened chocolate, but the final texture will be denser.
The Final Flourish
Vanilla extract is the subtle whisper that rounds off the flavor, adding warmth and complexity. Even a small amount (1 teaspoon) can dramatically elevate the overall profile. If you’re vegan or prefer a dairy‑free version, use a plant‑based vanilla or a splash of almond milk to keep the same silky texture.
Everything's prepped? Good. Let's get into the real action…
The Method — Step by Step
- Begin by setting up a double boiler: fill a saucepan with an inch of water and bring it to a gentle simmer. Place a heat‑proof bowl on top, ensuring it doesn’t touch the water. This setup will keep the chocolate from scorching while it melts. The sound of the simmering water is a comforting backdrop that signals the start of the chocolate journey.
- Add the dark chocolate to the bowl, breaking it into small chunks for even melting. Stir constantly with a heat‑resistant spatula until the chocolate is fully melted and smooth. Watch the temperature rise; you want it to hit about 115°F (46°C) before adding other ingredients. If it gets too hot, the chocolate can seize and become gritty.
- Pour the whole milk into the bowl, stirring gently to combine. The milk will help dissolve the sugar and create a silky mixture. Keep the heat low and stir until the mixture is uniform, then add the sea salt. This is the moment you can taste the base; it should have a balanced, slightly bitter chocolate flavor with a hint of sweetness.
- Watch Out: When adding the sugar, make sure it’s fully dissolved before moving on. If the sugar remains gritty, the fudge will develop an unpleasant texture. Stir until the sugar dissolves completely, and the mixture feels like a smooth, thick liquid.
- Now add the cocoa powder and stir for an additional minute. The cocoa will deepen the flavor and help thicken the fudge. Keep the mixture at a steady simmer, but do not let it boil. The goal is to reach the “soft ball” stage, which is when a small amount of the mixture drops from a spoon and forms a soft ball that slowly flattens.
- Add the butter and vanilla extract, stirring until the butter is fully incorporated and the mixture is glossy. The butter’s fat content is what gives the fudge its silky mouthfeel. As you stir, you’ll notice the mixture becoming thicker and more cohesive.
- Remove the bowl from the heat and let it cool for 5 minutes. During this time, the fudge will thicken further. This pause is critical; rushing this step can cause the fudge to set too quickly, making it difficult to pour.
- Kitchen Hack: While the mixture cools, line a 9x9 inch pan with parchment paper. This will make it easy to lift the fudge out once it’s set, and it also gives a clean finish to the edges.
- Pour the fudge into the prepared pan, spreading it evenly with a spatula. The surface should be smooth, but don’t worry if it’s a little uneven; it will level out as it cools. This is the moment of truth—watch the fudge settle as it begins to harden.
- Let the fudge cool to room temperature, then refrigerate for at least 2 hours until it’s firm enough to cut. Once set, lift the fudge out of the pan using the parchment edges and cut into squares. Serve immediately, or store in an airtight container for later.
That’s it — you did it. But hold on, I’ve got a few more tricks that’ll take this to another level…
Insider Tricks for Flawless Results
The Temperature Rule Nobody Follows
Most people think any simmer will do, but the fudge’s texture hinges on precise temperature control. Aim for 115°F (46°C) when the chocolate melts, and 170°F (77°C) when the mixture reaches the soft ball stage. A kitchen thermometer is a small investment that saves countless batch failures.
Why Your Nose Knows Best
Before you taste the fudge, inhale the aroma. A rich, chocolatey scent indicates that the chocolate has fully melted and the mixture is on the right track. If it smells under‑cooked or raw, let it simmer a bit longer.
The 5‑Minute Rest That Changes Everything
After removing the fudge from heat, let it sit for exactly five minutes before pouring. This brief rest allows the fats to re‑emulsify, creating a smoother final product. Skipping this step often results in a slightly grainy texture.
The Perfect Parchment Paper Trick
Line the pan with parchment paper that extends beyond the edges. When you lift the fudge, the paper will pull it out cleanly, preventing cracks. If you forget the parchment, the fudge may stick and crack when you try to cut it.
The Secret to a Glossy Finish
Add a splash of heavy cream to the mixture right before you pour. The extra fat enhances the shine, giving the fudge a professional look. Just a tablespoon is enough; too much will make the fudge too runny.
Creative Twists and Variations
This recipe is a playground. Here are some of my favorite ways to switch things up:
Nutty Delight
Fold in chopped walnuts or pecans before pouring. The nuts add crunch and a buttery flavor that pairs wonderfully with chocolate. This variation is perfect for holiday parties where you want something extra indulgent.
Spiced Surprise
Add a pinch of cayenne pepper or a dash of cinnamon to the mixture. The spice gives the fudge a subtle kick that surprises the palate, making it a conversation starter at dessert tables.
Almond Joy Twist
Incorporate shredded coconut and a splash of almond milk into the batter. The coconut adds texture while the almond milk deepens the nutty undertones, creating a dessert reminiscent of a classic candy bar.
Minty Marvel
Replace the vanilla extract with a few drops of peppermint oil. The mint gives a refreshing aftertaste that balances the chocolate’s richness, especially great for summer gatherings.
Coffee‑Infused Indulgence
Stir in a tablespoon of cold brew coffee before pouring. The coffee enhances the chocolate’s depth, producing a mocha‑like flavor that’s both bold and sophisticated.
Vegan Version
Swap the whole milk for oat milk and the butter for coconut oil. This creates a completely plant‑based fudge that still retains the silky texture and rich flavor, making it suitable for dairy‑free diets.
Storing and Bringing It Back to Life
Fridge Storage
Store the fudge in an airtight container at room temperature for up to 5 days. Keep it in a cool, dry place away from direct sunlight to preserve its glossy finish. If the fudge becomes slightly soft, let it sit at room temperature for a few minutes before serving.
Freezer Friendly
Wrap each square individually in parchment paper and place them in a freezer‑proof bag. The fudge can be frozen for up to 3 months. When ready to eat, let it thaw at room temperature for 15 minutes before cutting.
Best Reheating Method
To revive the fudge’s silky texture, heat it in a double boiler for 5 minutes, stirring constantly. Add a tiny splash of water or milk before heating to create steam that restores moisture. Once heated, pour back into a pan to set again if you want a fresh batch.